


Airtable is an amazing way to manage, store, and organize data, but from an interface perspective, the spreadsheet/database hybrid is not the most aesthetically pleasing, especially for the less technically inclined users.
This step-by-step guide shows you three ways you can build an attractive interface page for your Airtable data:
- How to build an interface in Airtable with Softr;
- How to build an interface in Airtable with the Airtable Interface Designer;
- How to build an interface in Airtable with extensions from the Airtable Marketplace.
How to build an interface in Airtable with Softr
The fastest, most powerful way to build an interface page for Airtable is to link your base datum with Softr.
Softr is a no-code app-builder that helps you create interface pages based on Airtable data, from client portals to internal tools and dashboards.
Building a custom interface takes around 10 minutes and is entirely free using Softr’s free plan.
The level of customization and granularity offered by Softr makes it a very compelling option to build an interface in Airtable.
The platform lets you share that interface with specific permissions and offers a variety of pre-made templates to get started with.
Follow the steps to create an interface on Softr based on your Airtable data.
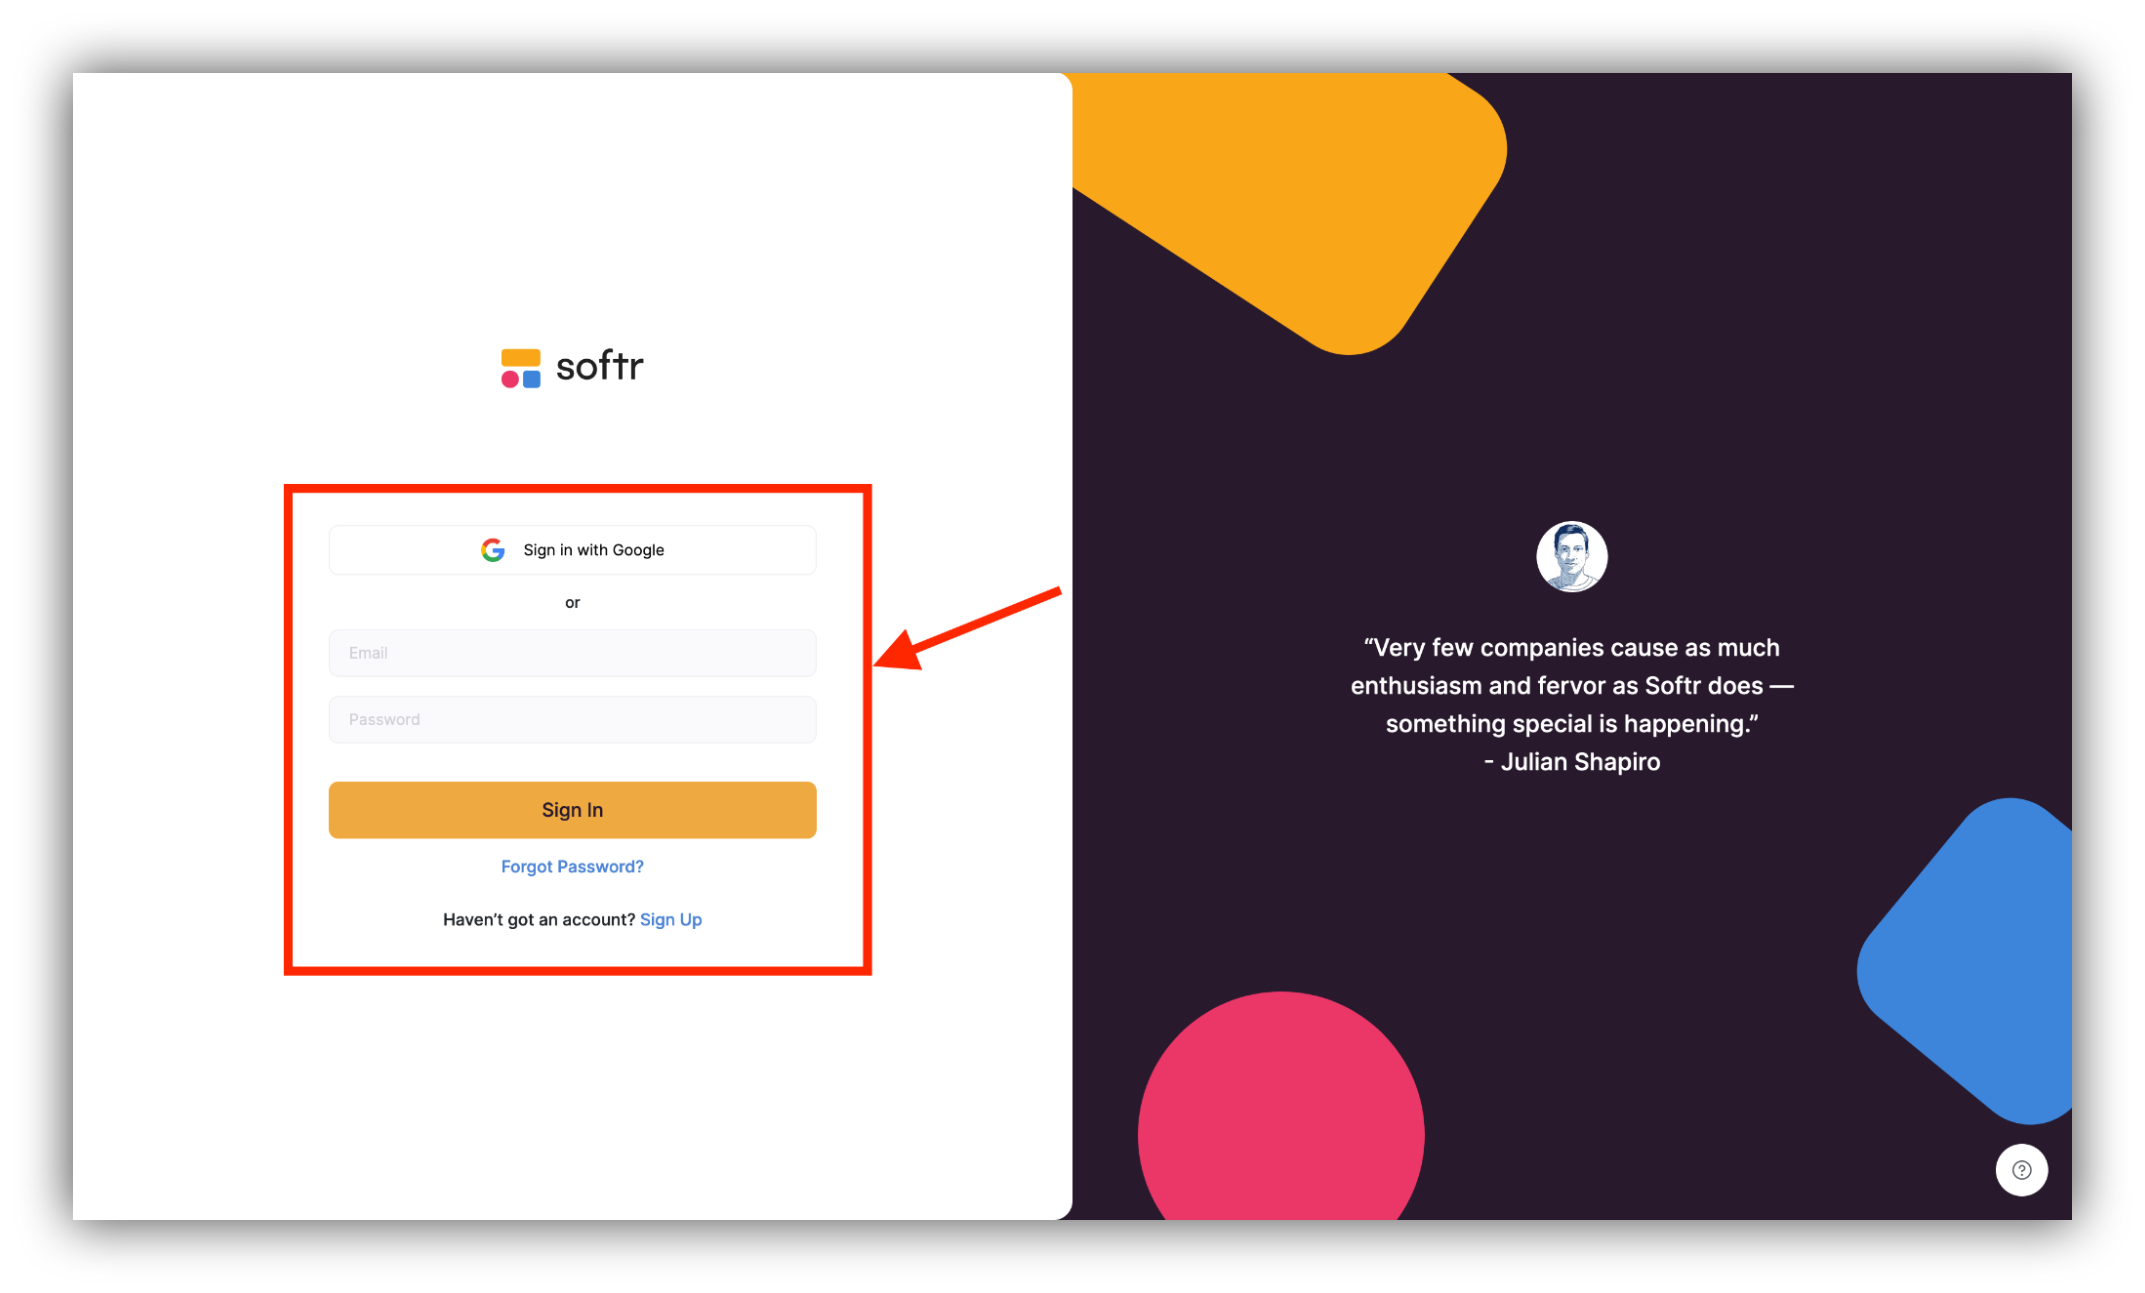
Step 1: Log in to Softr
Airtable users can easily link up with Softr. Log in to your Softr account, or create an account for free.
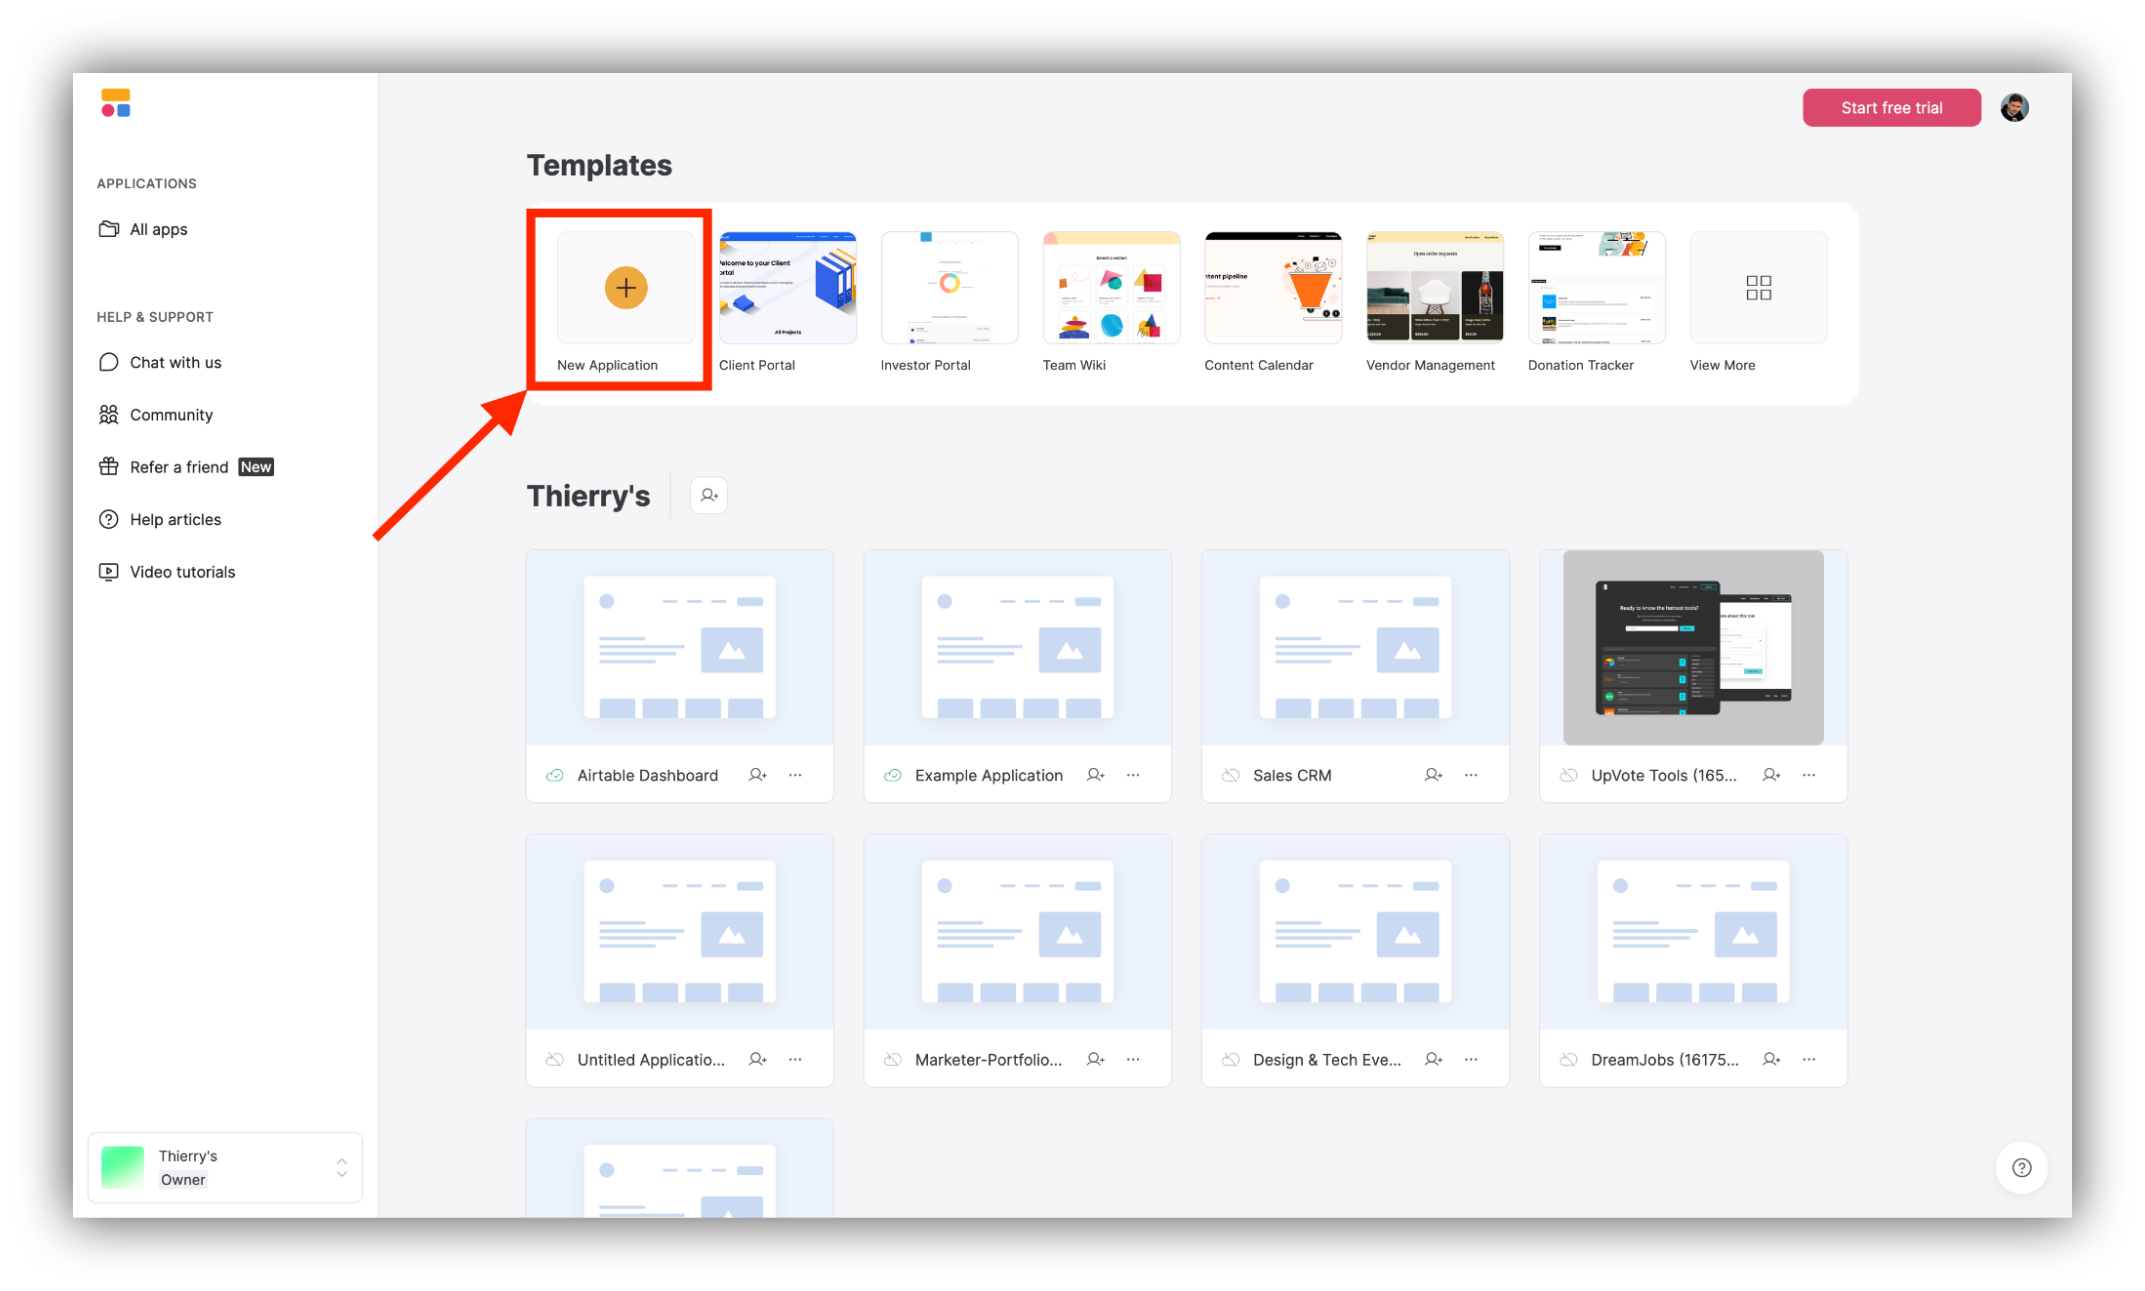
Step 2: Click on “New application”
First, let’s create an application design with Softr.
For the sake of this example, we chose to start with a template that will give us a great Airtable base datum to work on, as well as a corresponding application on Softr.
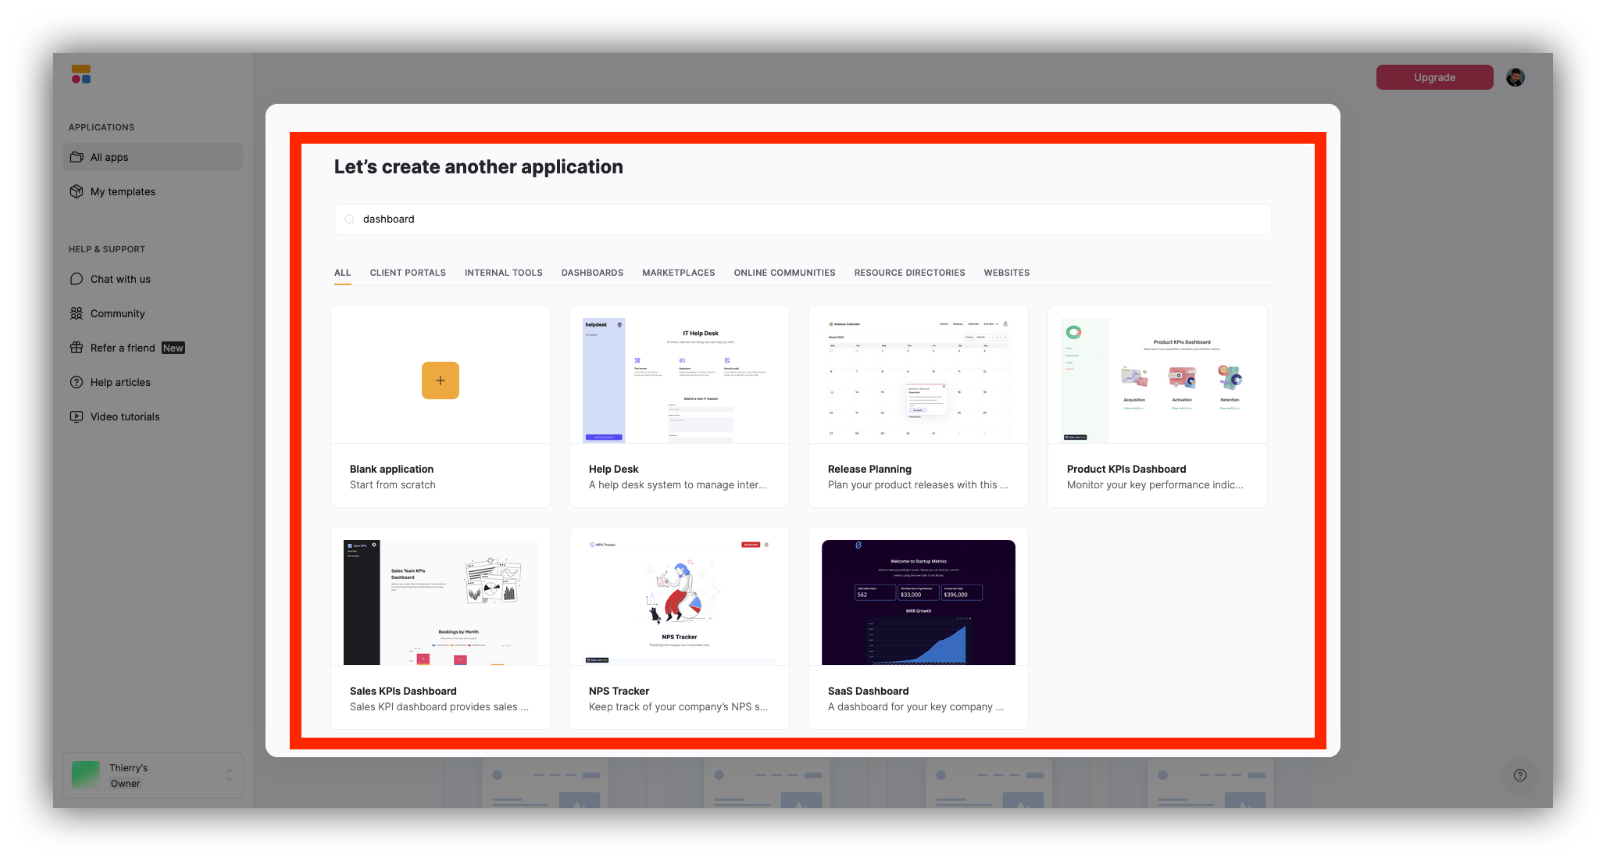
Step 3: Select a template
You can use the search bar to lookup layout options or browse the available templates.
For this example, we chose to use the Employee Directory template.
This interface page design helps organizations view and manage their company and employee information in one place.
Step 4: Click on “Use Template”
Let’s get started with our employee directory. Click on the template to get started with your new interface.

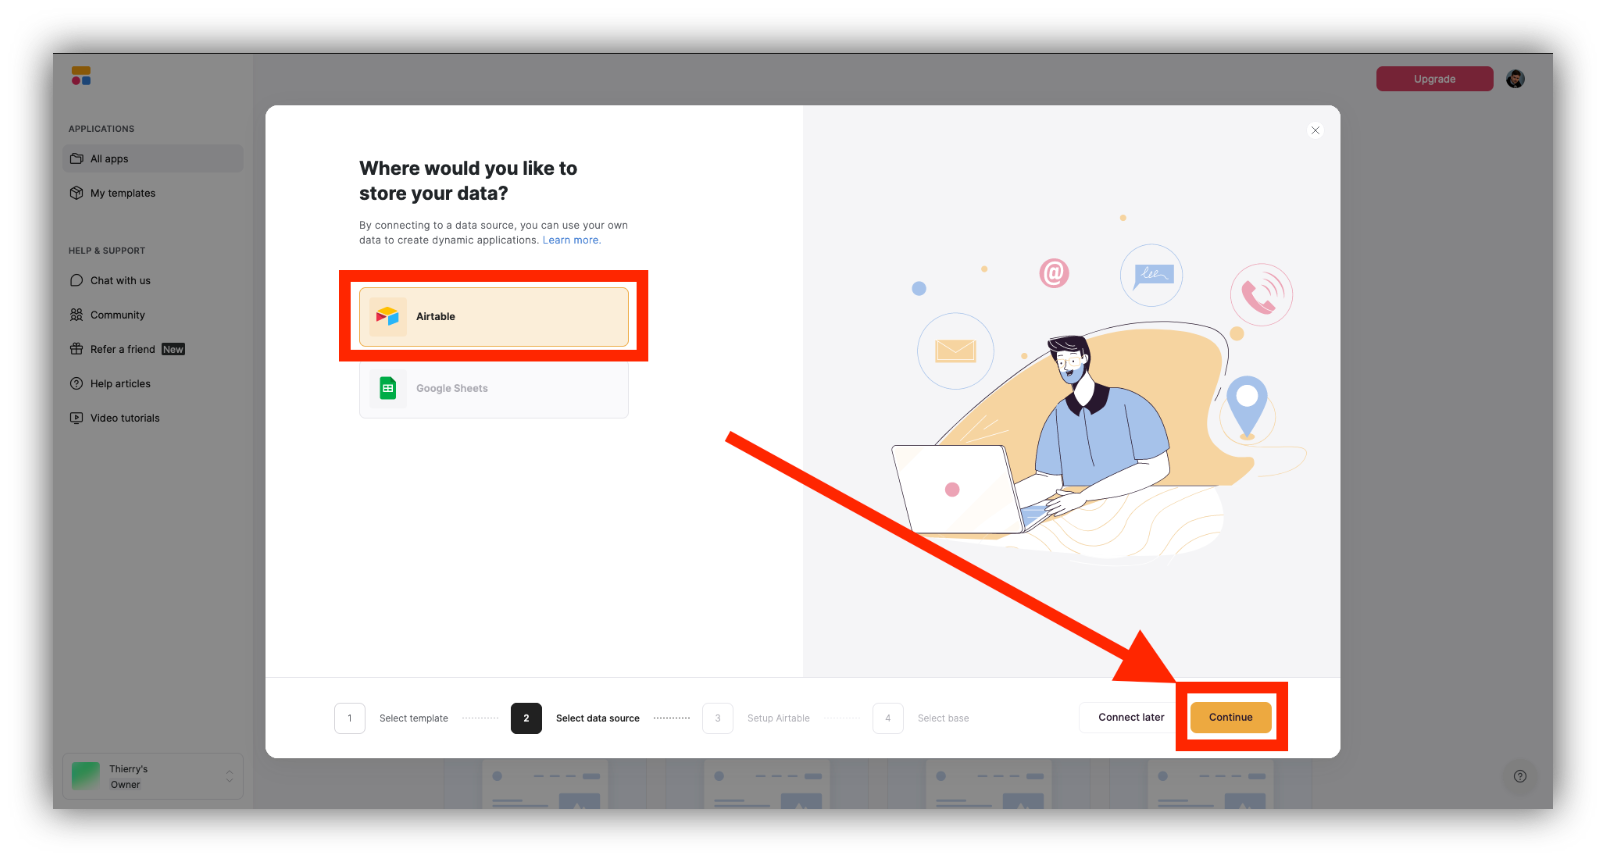
Step 5: Choose Airtable as your data source
In order to choose Airtable as the data source for your interface, click on “Airtable” and then on “Continue.”
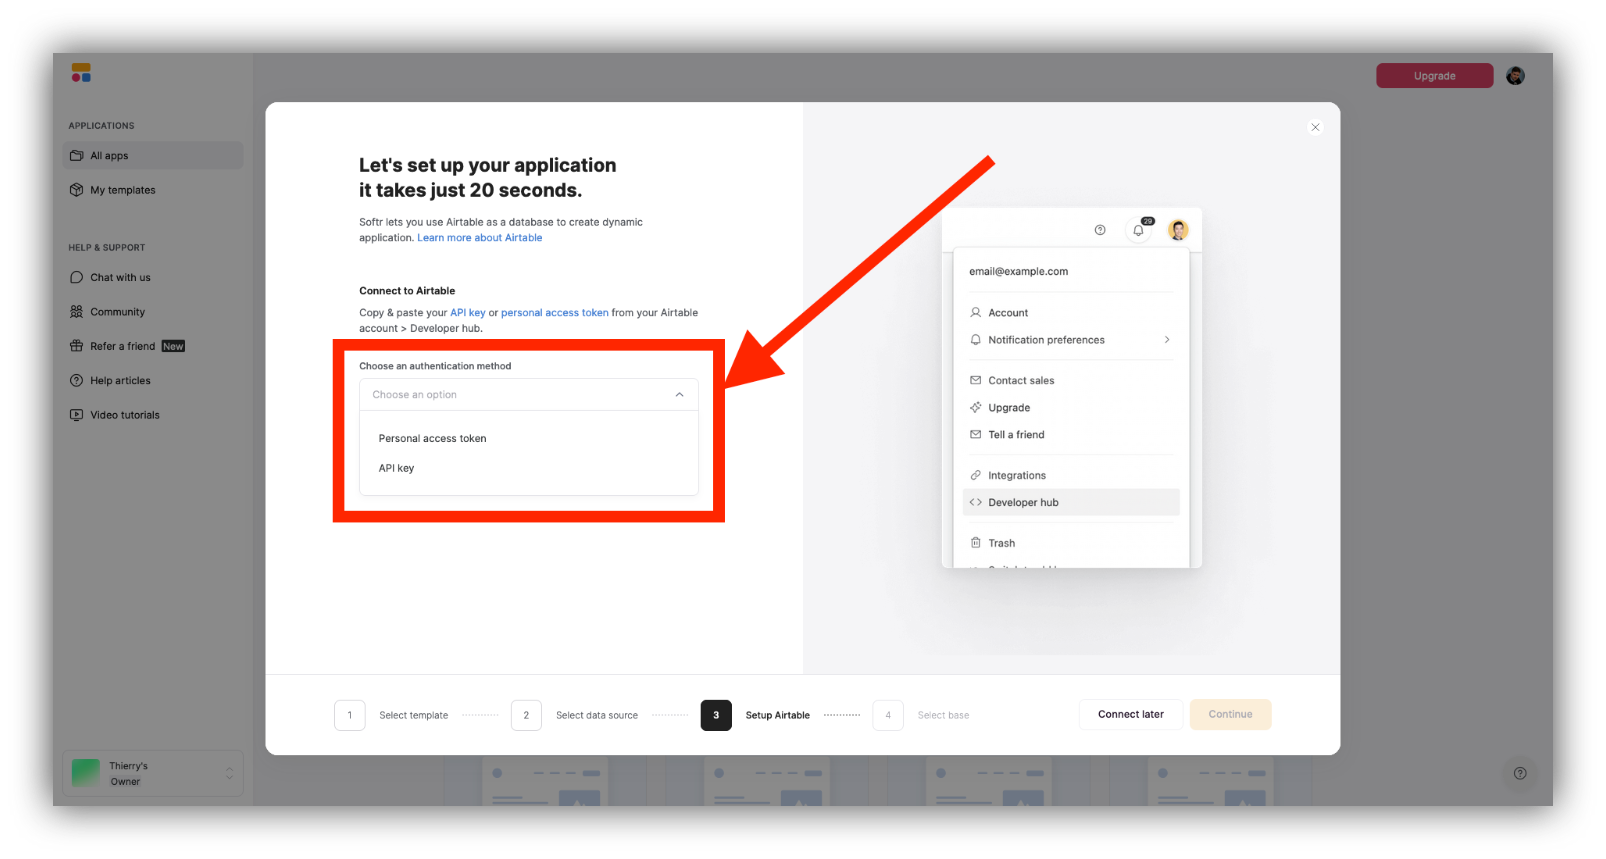
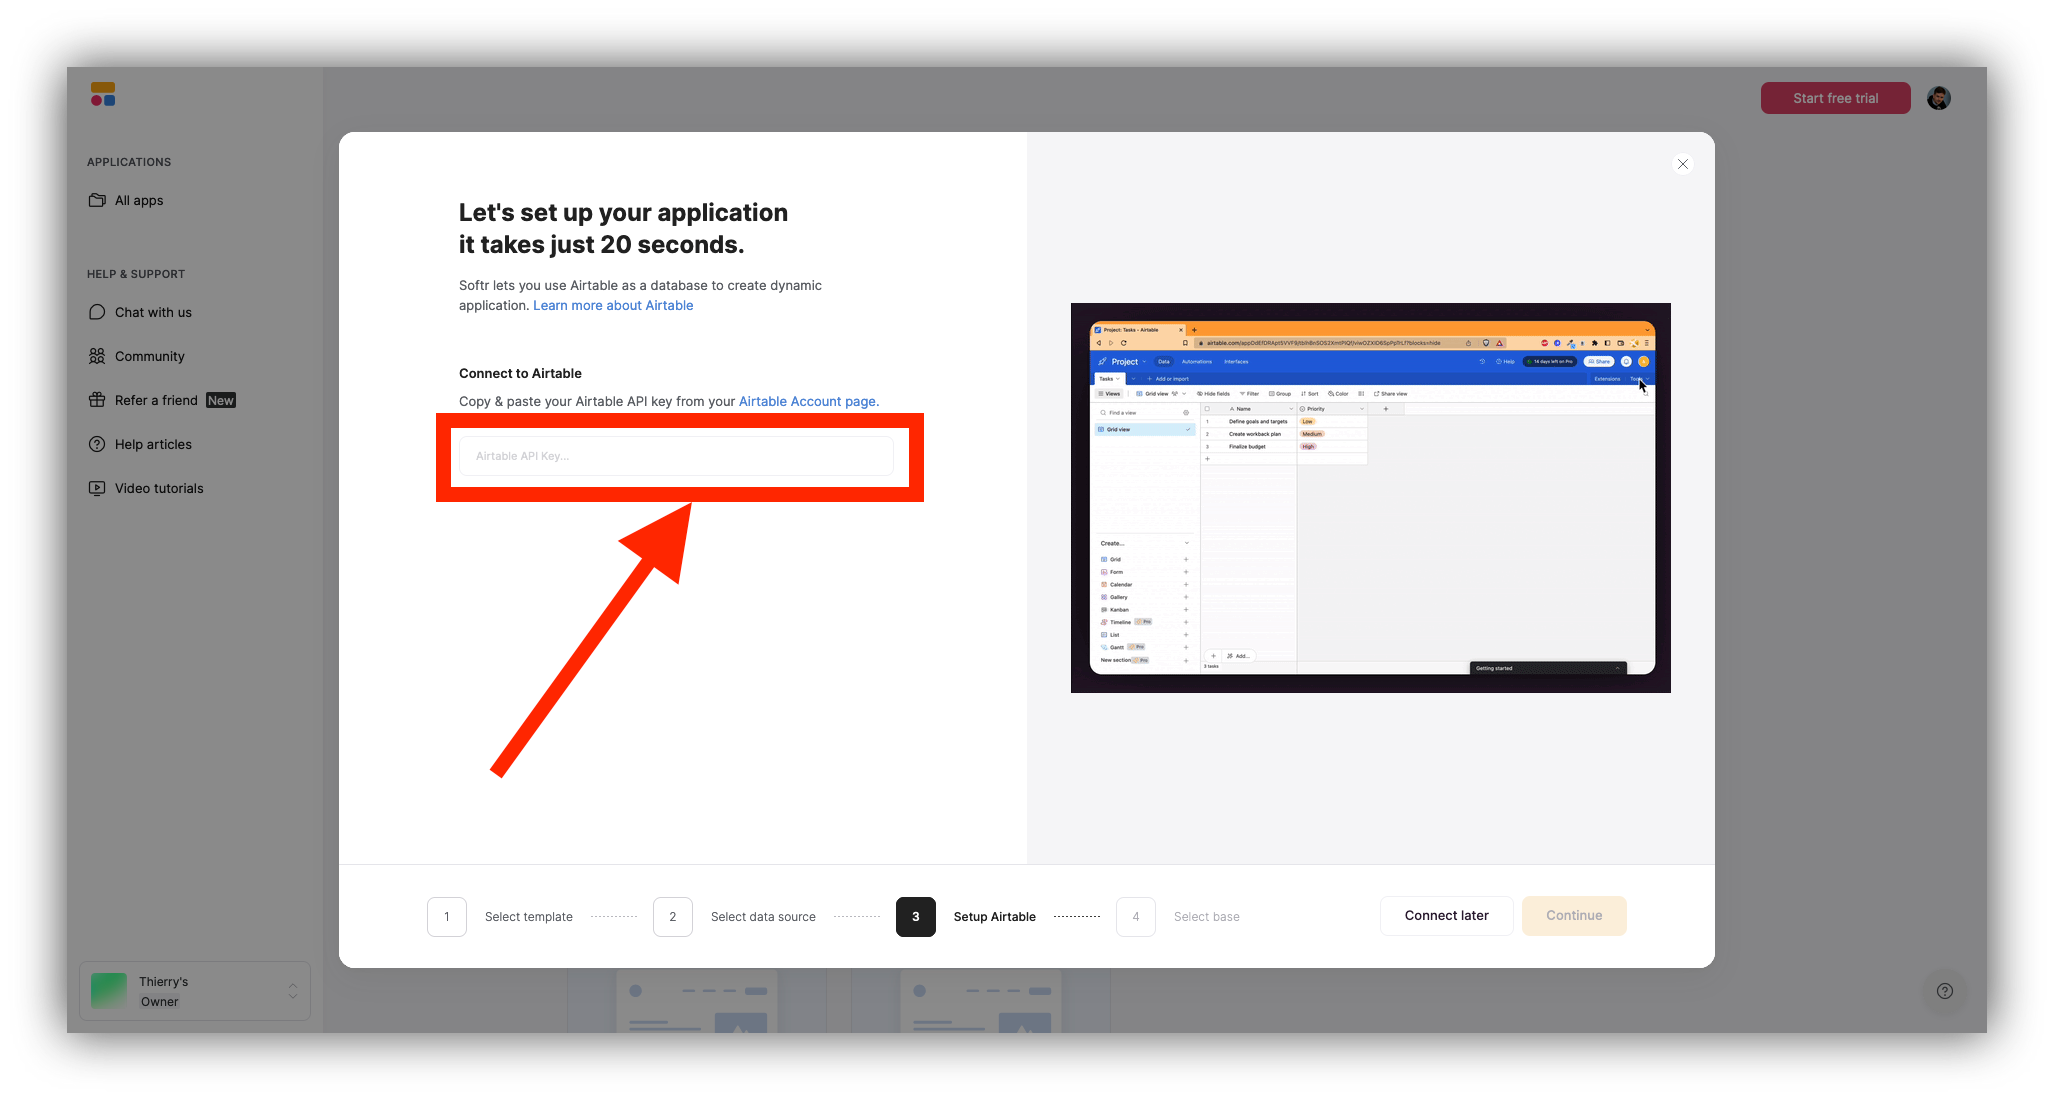
Step 6: Choose your authentication method
An authentication option will appear next.
You have the choice between using a personal access token or your API key.
Follow the steps on the screen or the next few sub-steps below to get your Airtable API key.
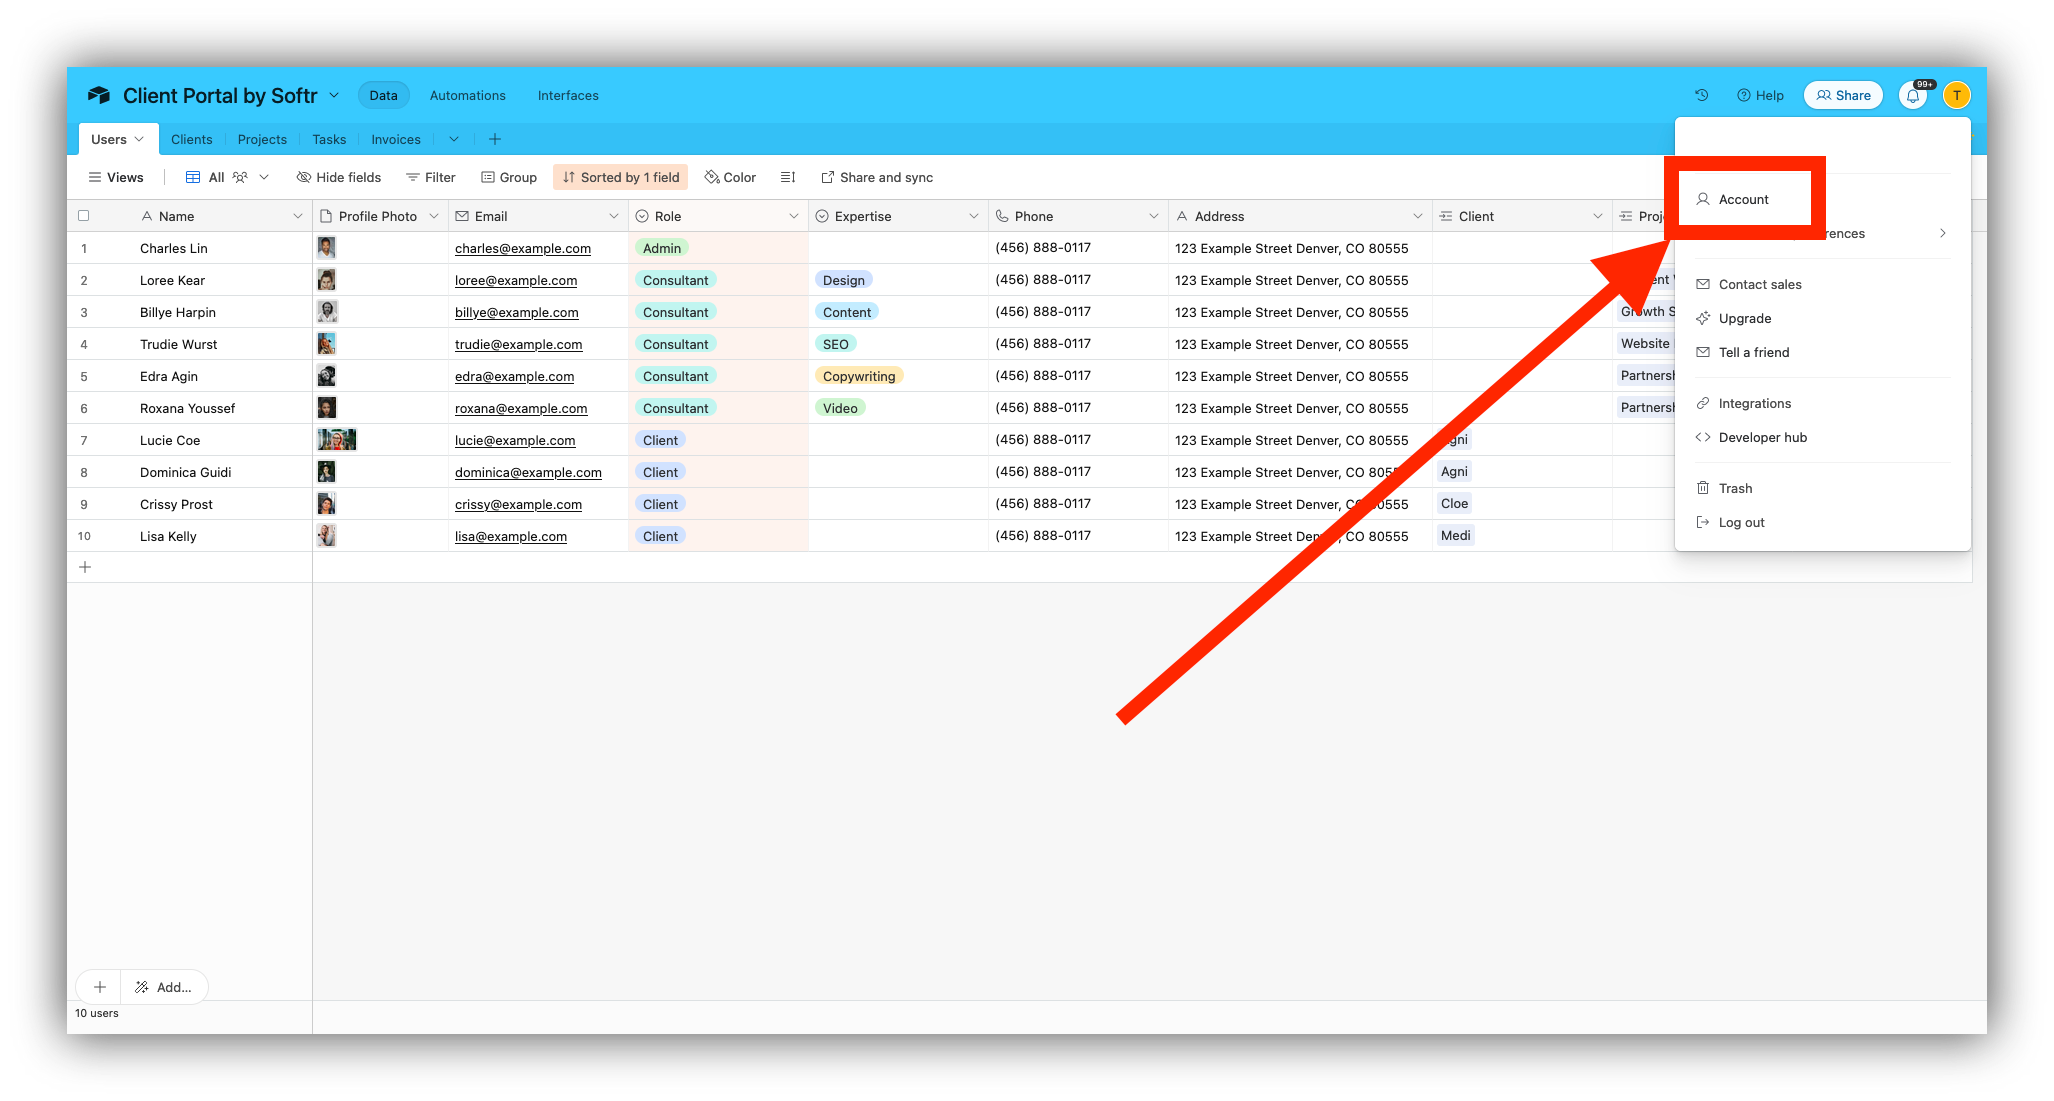
Step 6.1: Go to your Airtable Account
Login into your Airtable user account.
Click on your icon in the top corner of the right hand side of your screen. Then click on “Account.”
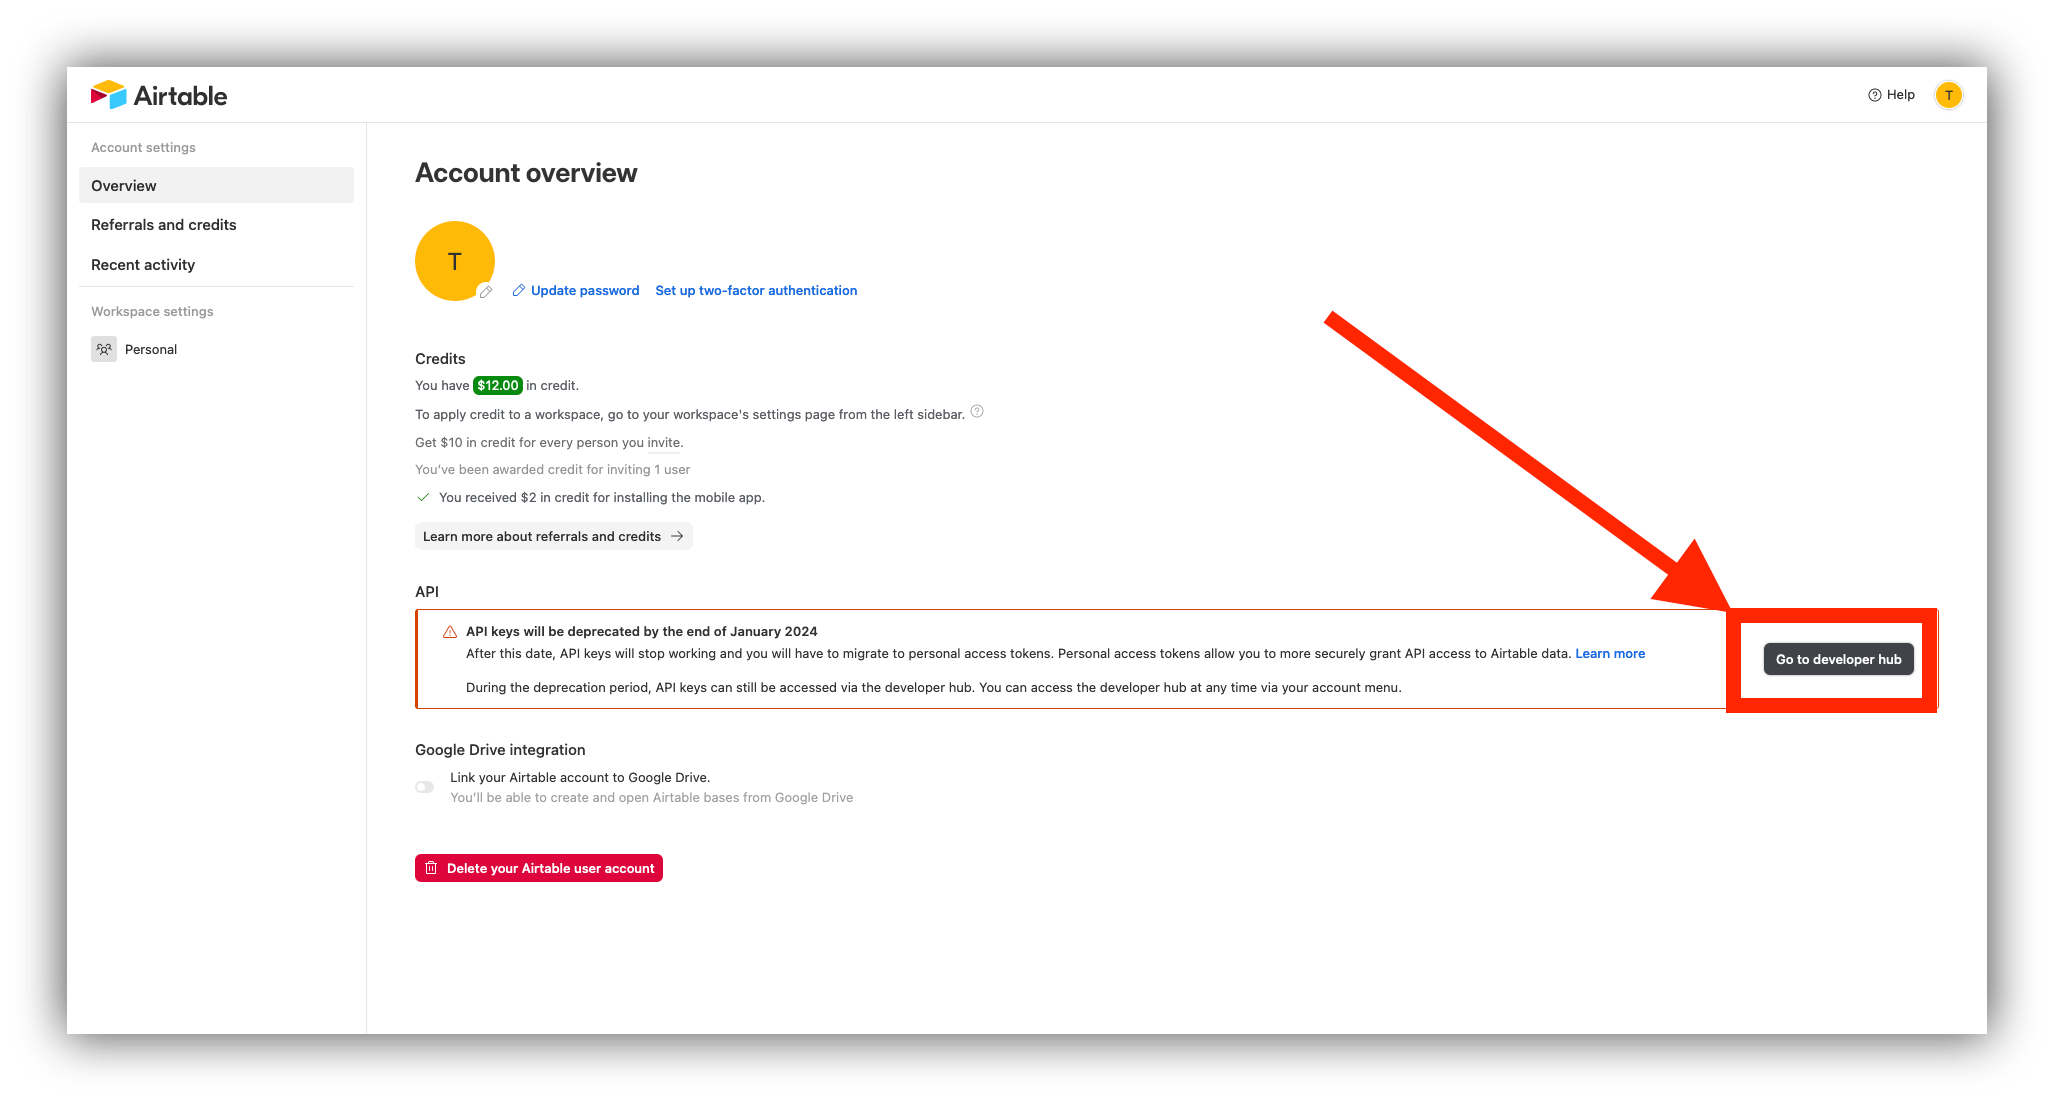
Step 6.2: Go to the Airtable developer hub
From your account page in the “Overview” tab, click on the “Go to developer hub” button.
Step 6.3: Copy your API key
Select and copy your API key, a string of letters that will allow you to connect your Softr and Airtable data.
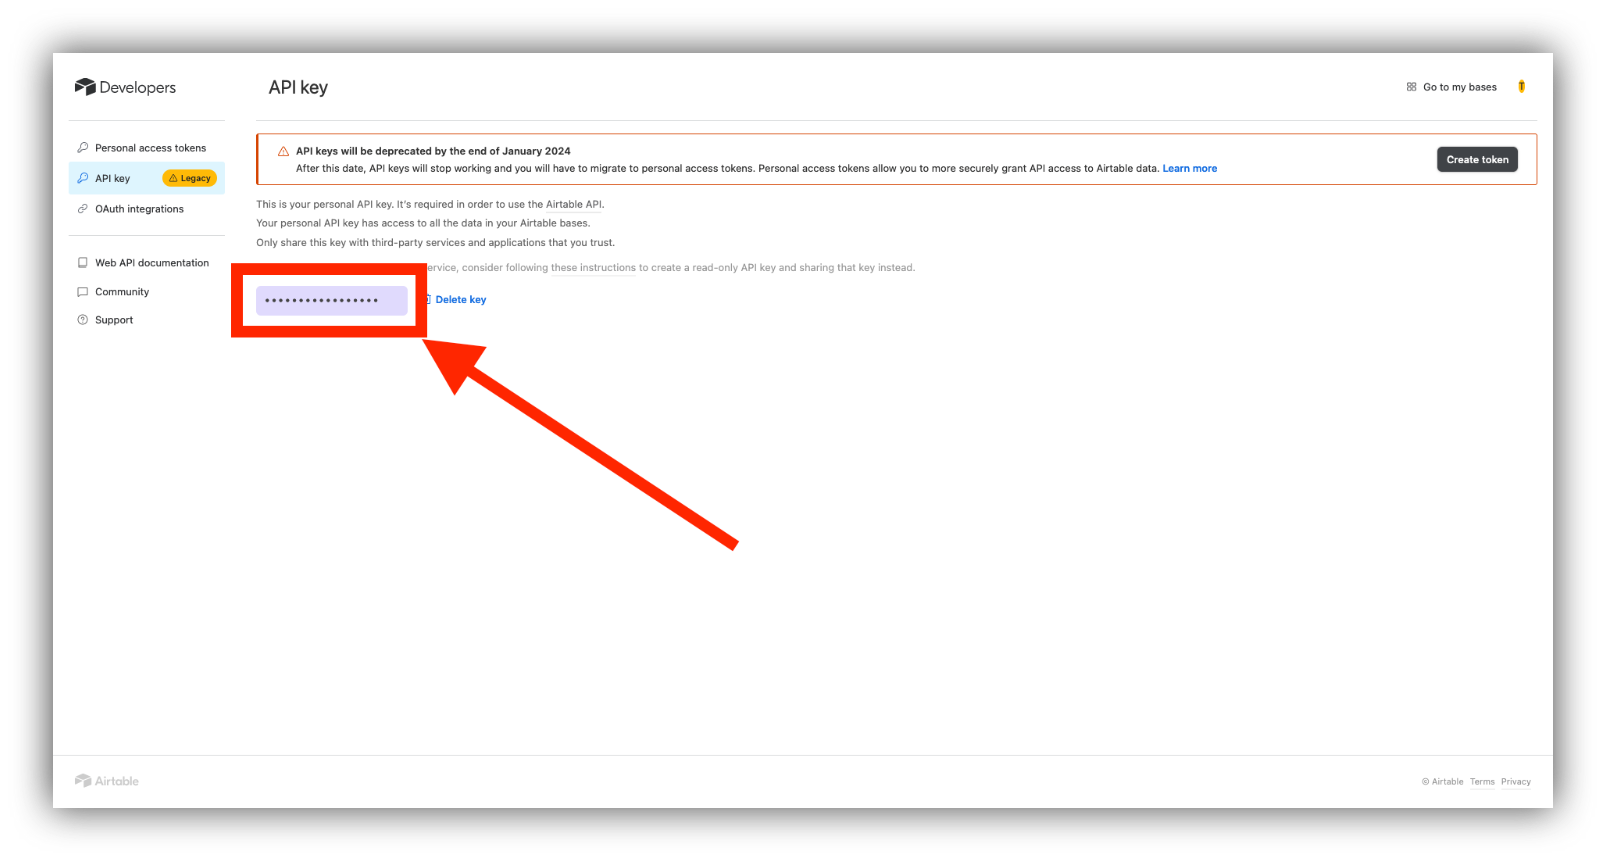
Step 6.4: Paste your API key on Softr
Head back to Softr, paste the API key to the relevant field, and click on “Continue.”
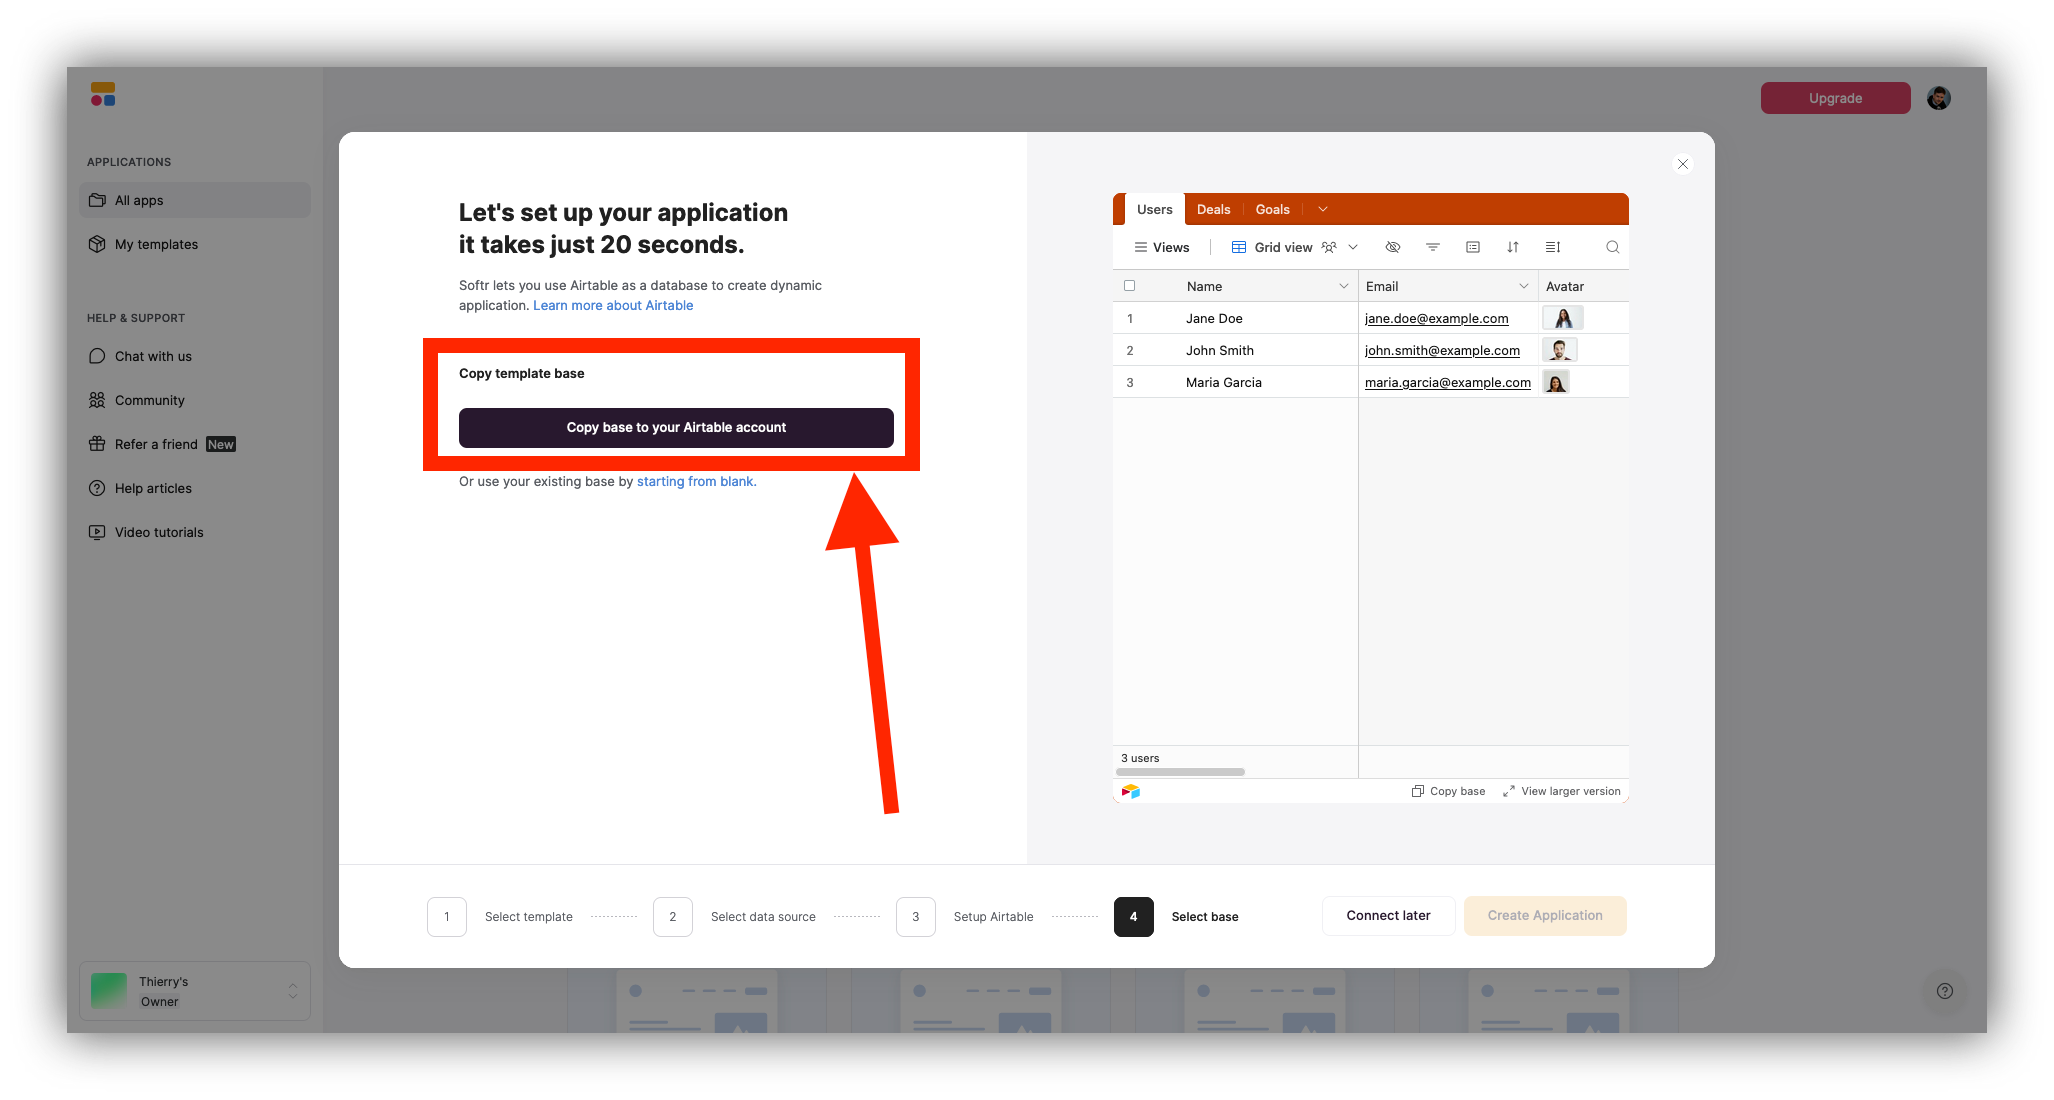
Step 7: Click on “Copy base to your Airtable account”
Copy the Airtable base that is part of the Softr template onto your Airtable account.
This will redirect you to Airtable.
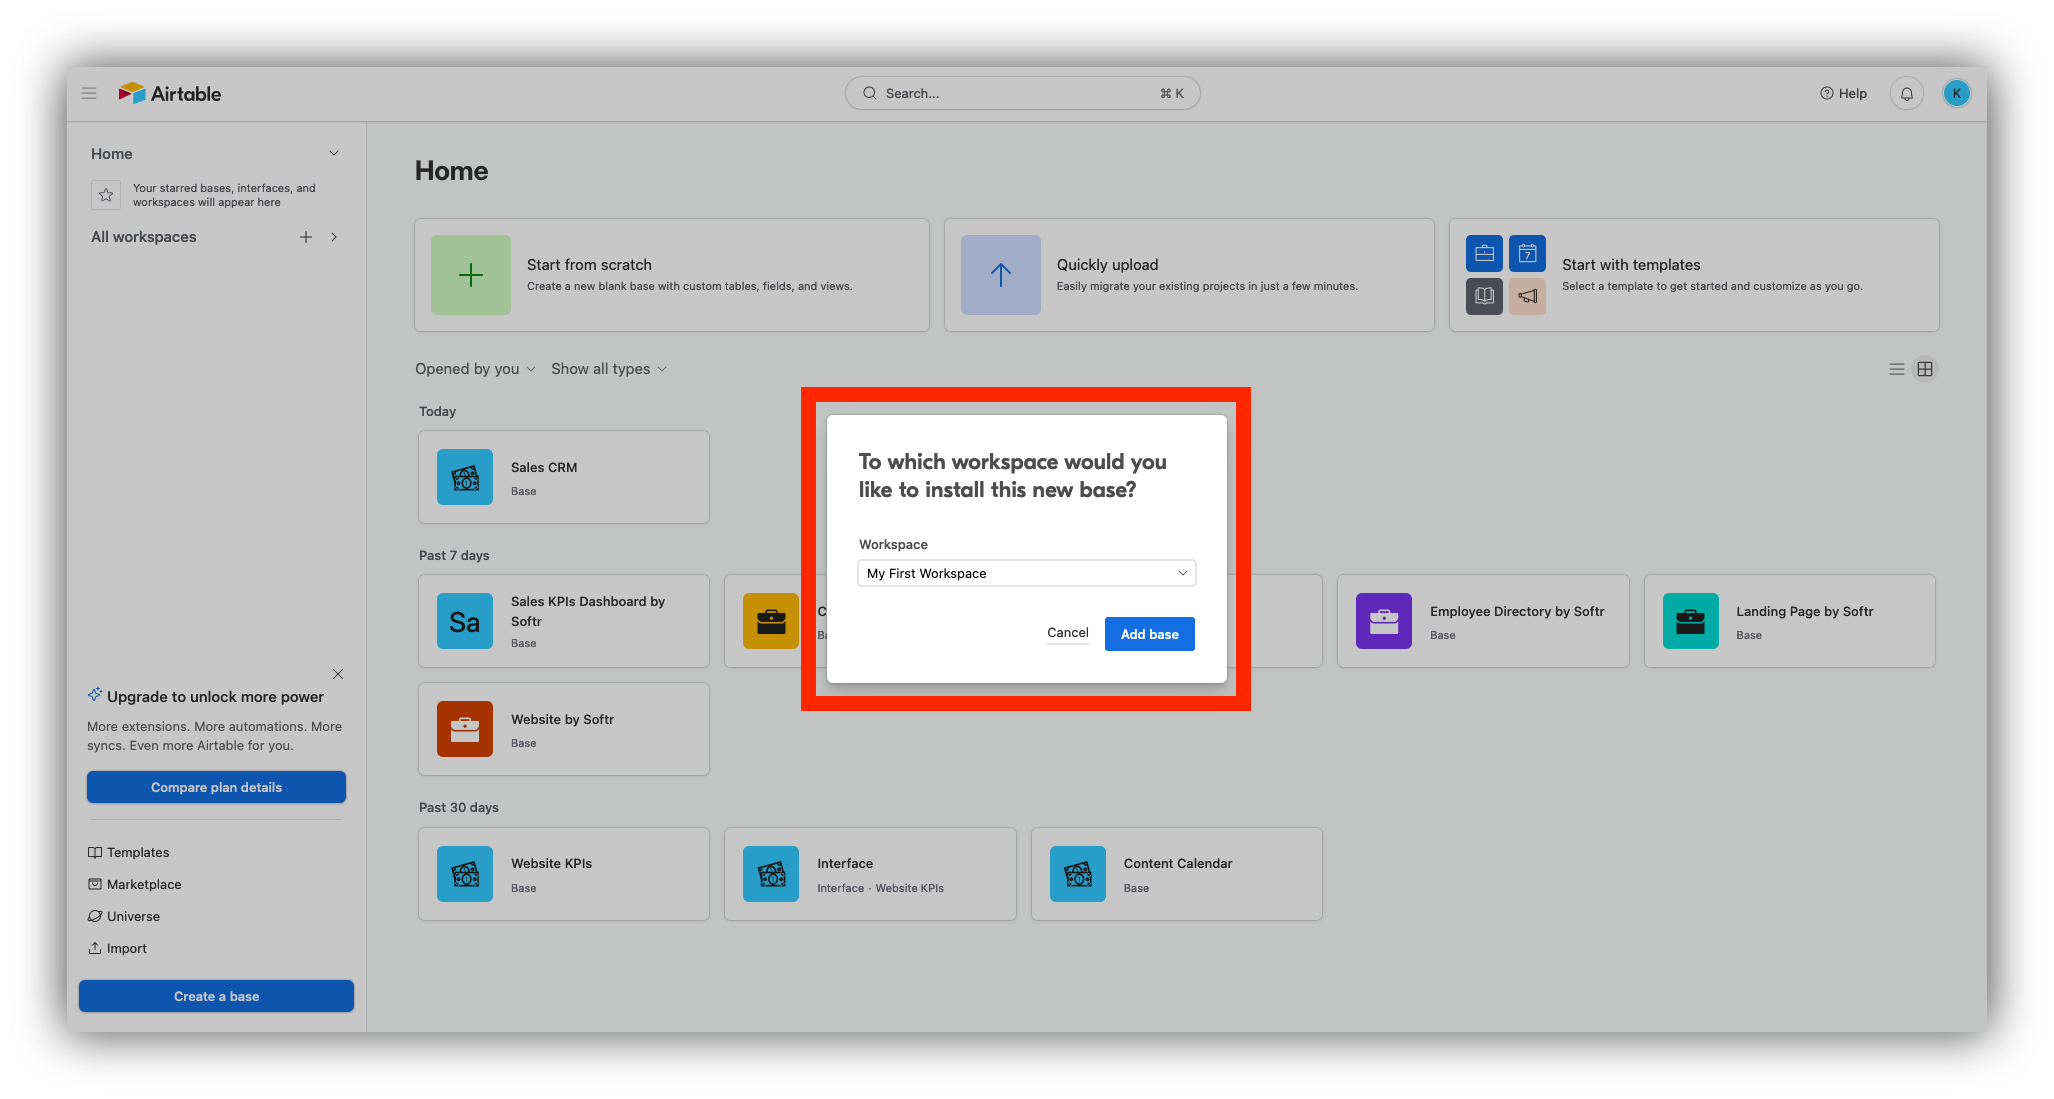
Step 8: Choose the workspace on which to add the Airtable base
Use the drop-down list menu to choose which visible workspace you’d like to add the Airtable base to.
Then click on “Add base.”
Step 9: Your interface is now synced with your Airtable data
You've done it!
Changes in your Airtable data will be visible in your new interface created with Softr.

Step 10: Customize your Softr interface page
With Softr, you can do much more with your Airtable data, including customizing your new interface visualization to your liking.
Here are examples of easy edit options that you can use to build a custom interface page.
Step 10.1: Add new blocks to your interface page
As it stands, your new interface is based on a template, but you have the freedom to change a lot in edit mode.
Softr lets you adapt the appearance of your interface page by adding dynamic or static blocks, including:
- Interface forms;
- Table layouts;
- Lists;
- Charts;
- Kanban boards;
- and more.
In order to add a block, click on “Add block” and select which block you want to add in the panel that appears.

Step 10.2: Set end user permissions for each block
By clicking on individual blocks of your app, you can select the “Visibility” tab and pick what end users should be able to access that content.
This is particularly useful for a sensitive datum source.
In our specific use case, the HR manager and an employee shouldn’t have the same level of permissions and see the same information.
We've made sure to update the interface permissions so that each end user has different access levels.

Step 10.3: Publish your interface
Whenever you’re ready to make your interface page live, click on “Publish” in the top-right corner.
Softr will offer the option to set up a custom domain and/or subdomain. Once you’re set, hit “Publish” again.
Your interface is live!

How to build an interface in Airtable with the Airtable Interface Designer
A straightforward way to create an interface page for your Airtable data is to use Airtable’s native feature: the Interface Designer.
Airtable's Interface Designer is directly accessible from Airtable and allows you to create a front-end interface page using the data in your Airtable base, including:
- Dashboards and progress updates;
- Base datum graphs;
- Charts;
- Other data visualizations in table layouts, multiple tables, and more.
The interface creation process takes around 5 minutes, and the feature is included in Airtable’s free plan, although some options—such as permissions settings and other advanced controls—will only be available for subscribers to Airtable paid plans starting at $20/month.
Follow the next steps to learn how to create an interface using the Interface Designer.
Step 1: Select your Airtable base
In Airtable, click on the underlying base of your choice.
We will build an interface using the data from that specific base. For this example, we’ve selected a Sales Dashboard we recently built with Softr and Airtable.

Step 2: Click on “Interfaces”
In Airtable's underlying base, select the “Interfaces” tab at the top of the screen.

Step 3: Click on “Start building”
Read the description provided by Airtable, and whenever you’re ready, click on the button to start building your interface page.

Step 4: Name your interface
Give a name to your interface page, assign it an icon, and click on “Next” to go to the next step.

Step 5: Choose your interface layout
You have several choices of default layouts to build your interfaces.
Some of the layout options offered by Airtable include:
- List, a layout to organize and prioritize items;
- Gallery, an image-first visualization of your records;
- Kanban, a column-based visualization for project management;
- Calendar, a time-focused structure including calendar month, week, or day;
- Timeline, a linear time-based project visualization;
- Dashboard, an interface to show numbers, charts, and visualizations;
- Form, to collect and organize input from users;
- Record review, to review details of many records at a glance from one table;
- Record summary, to get detailed overviews of one single record;
- Blank interface, to start with a clean canvas.
For this tutorial, we chose to go with a Kanban layout for our interface visualization.
Once you’ve made your choice, click on “Next.”

Step 6: Connect your layout to a table
Select which table of your base should be displayed in your interface page.
In this example, we want to showcase the deals in our database on a Kanban board in order to have a bird’s-eye view of where our deals stand.
When you’re ready, click on the “Finish” button.

Step 7: Get more from your Airtable interface
The first iteration of your interface home screen is ready, but you can do a lot more.
Here are a couple of examples of actions you can take with your Airtable interface.
Step 7.1: Customize your interface
This is a great way to take your interface page to the next level. It's especially useful when working with end users that are clients or external stakeholders.
Upon clicking on elements of your interface, use the edit option to modify your design.
This includes changing the design or table layout, changing the types of fields displayed, adding filters, and more.

Step: 7.2: Add a page to your interface
Your interface doesn’t have to be a single-page front-end.
By clicking “Add page” in the right-side panel, you can add additional pages and datum layers, repeating the process of choosing layouts, elements, tabs, etc.

Step 7.3: Generate a preview
As you build your Airtable interface, you can visualize what the final result will look like for end users once published.
To do so, click on “Preview.”

Step 8: Click on “Publish”
Once you’re happy with your interface page, click on “Publish” in the top right corner of the screen.
You’ll be invited to share the interface for more collaboration.
How to build an interface in Airtable with extensions from the Airtable Marketplace
Another option to create an interface in Airtable is to find an extension in the Airtable Marketplace that allows you to do it.
Note: These Airtable extensions are free but are sometimes dependent on another tool that requires a subscription, so be mindful when getting started.
Adding an extension to your Airtable from the marketplace is straightforward and should take around 5 minutes to set up.
Step 1: Go to the Airtable Marketplace
Head to the Airtable Marketplace to find a list of extensions.

Step 2: Search for an extension
Sort through the visible categories or enter a keyword in the search field to look up an extension for your base.
For this example, we chose to go with the Miro extension, which helps you visualize your records in the collaborative whiteboard tool.

Step 3: Add the extension
On the extension page, feel free to read the description to see if it matches your use case.
When you’re ready to get started, click on “Add extension.”

Step 4: Select your base and click “Add extension”
Select the underlying base that you want to create an interface page for.

Step 5: Add the extension to your base
Once you’ve gone over the fine print and are ready, click on “Add Extension.”

Step 6: Set up the extension
The process to set up the extension will be different for each.
In the case of our example, it involves logging in to Miro and adding a board to Airtable.
Start by clicking on “Add a Miro Board.” You’ll be redirected to Miro.

Step 6.1: Select which Miro board to embed
Once redirected to Miro, you’re invited to select which of your Miro boards to embed.
Choose a layout or create a new one.

Step 6.2: Set permissions level and embed board
Select the permission level of visitors and end users—whether they can edit, view or require access to the board— and then click on "Embed board."

Step 6.3: Your Miro board is now embedded
You can access your Miro board directly from the “Extensions” tab on the right of your table in Airtable.

Step 7: Take advantage of your newly created interface
The extension panel will be on the right side of your screen.
In our example, we added a Miro interface using our Airtable data related to sales. Now salespeople can use this interface page to keep the customer journey in mind when checking their KPIs. Use the share button to collaborate or hand over to end users.
Each extension will bring different benefits, so ensure you browse the Airtable Marketplace to find the one that fits your needs.

Your Airtable Guide to Build a New Interface Page
An interface page is a great way to sort, collaborate on, and share datum. It lets you ensure security of business information and reduce clutter — all while making things easier for end users.
Build and share your interface in no time by taking advantage of one of the three options above.
Want to build a powerful Airtable interface in no time at all? Get started with Softr today!
What is Softr
Softr is the easiest way to turn your data into powerful business apps—no code required. Connect to your spreadsheet or database, customize layout and logic, and share with your team or clients.
Join 700,000+ users worldwide, building client portals, internal tools, CRMs, dashboards, project management systems, inventory management apps, and more—all without code.
Join 700,000+ users worldwide, building client portals, internal tools, CRMs, dashboards, project management systems, inventory management apps, and more—all without code.
Get started free

Thierry Maout
Thierry is a content marketer based in France. He has extensive experience writing about B2B SaaS, automation, and user onboarding. Originally from France, he has lived and worked in Ireland, the US, Germany, the UK and Canada as well as collaborated with companies from all over the world including UserGuiding, Make (formerly Integromat), and others. Thierry has a Bachelor's degree in International Affairs from Le Havre University (France) as well as a Master's degree in Law, Economics, and Management from the Institute of Evolutionary Science of Montpellier (France). Passionate about education and the no-code movement, Thierry has been featured in publications such as UX Collective and The Startup on Medium. A frequent Softr collaborator (freelance-based), he’s also a former startup co-founder and has, among others, co-founded and managed growth at Fairwai.


Categories


