


For advanced users that want to get deeper into Airtable and start introducing automation into their bases, Airtable offers the option to create their own scripts, essentially implementing snippets of code to automate specific actions and tasks.
Because of the technical nature of the topic, however, it is quite difficult to find documentation about it and figure out where to get started.
Fret now, as we’ve put together a guide to bring some clarity and guidance. Keep reading to learn everything you need to know about Airtable scripting!
What is Airtable scripting and how to get started?
The scripting app allows you to write code in Airtable. This allows you to introduce automation elements in your projects, automatically running specific tasks and actions. This is especially helpful if you’re looking to:
- Streamline repetitive, multi-step workflows
- Put data validation and formatting on auto-pilot
- Enable cross-table search and reporting
- Import external data from specific sources
To get started with scripting on Airtable, you must first install the scripting app from the Airtable Marketplace. Please note that you must be on the pro plan to do so (you have the ability to sign up for a trial first).
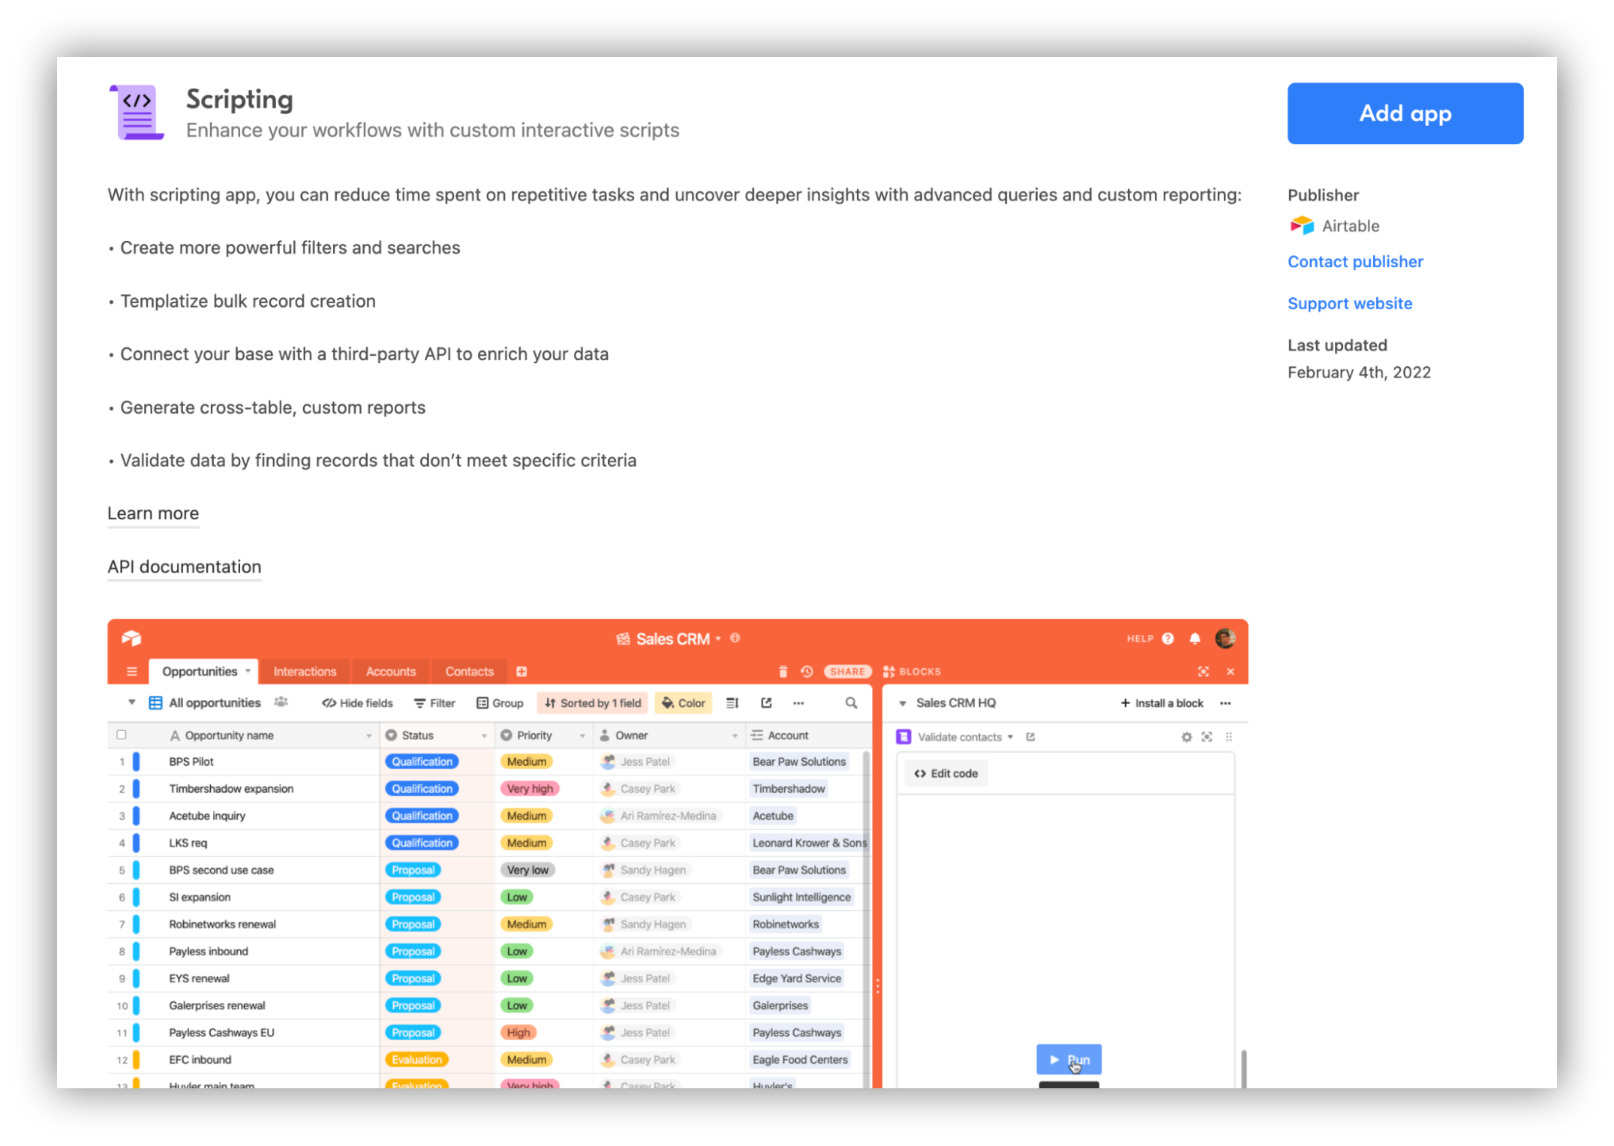
The next step is to add the Scripting app on one of your bases (watch for the number of apps per base, depending on your plan). Once you have, you’ll be onboarded with a welcome screen, some templates you can pre-select (more on that later), and a bit of documentation.
After a couple of onboarding screens, you are ready to go!
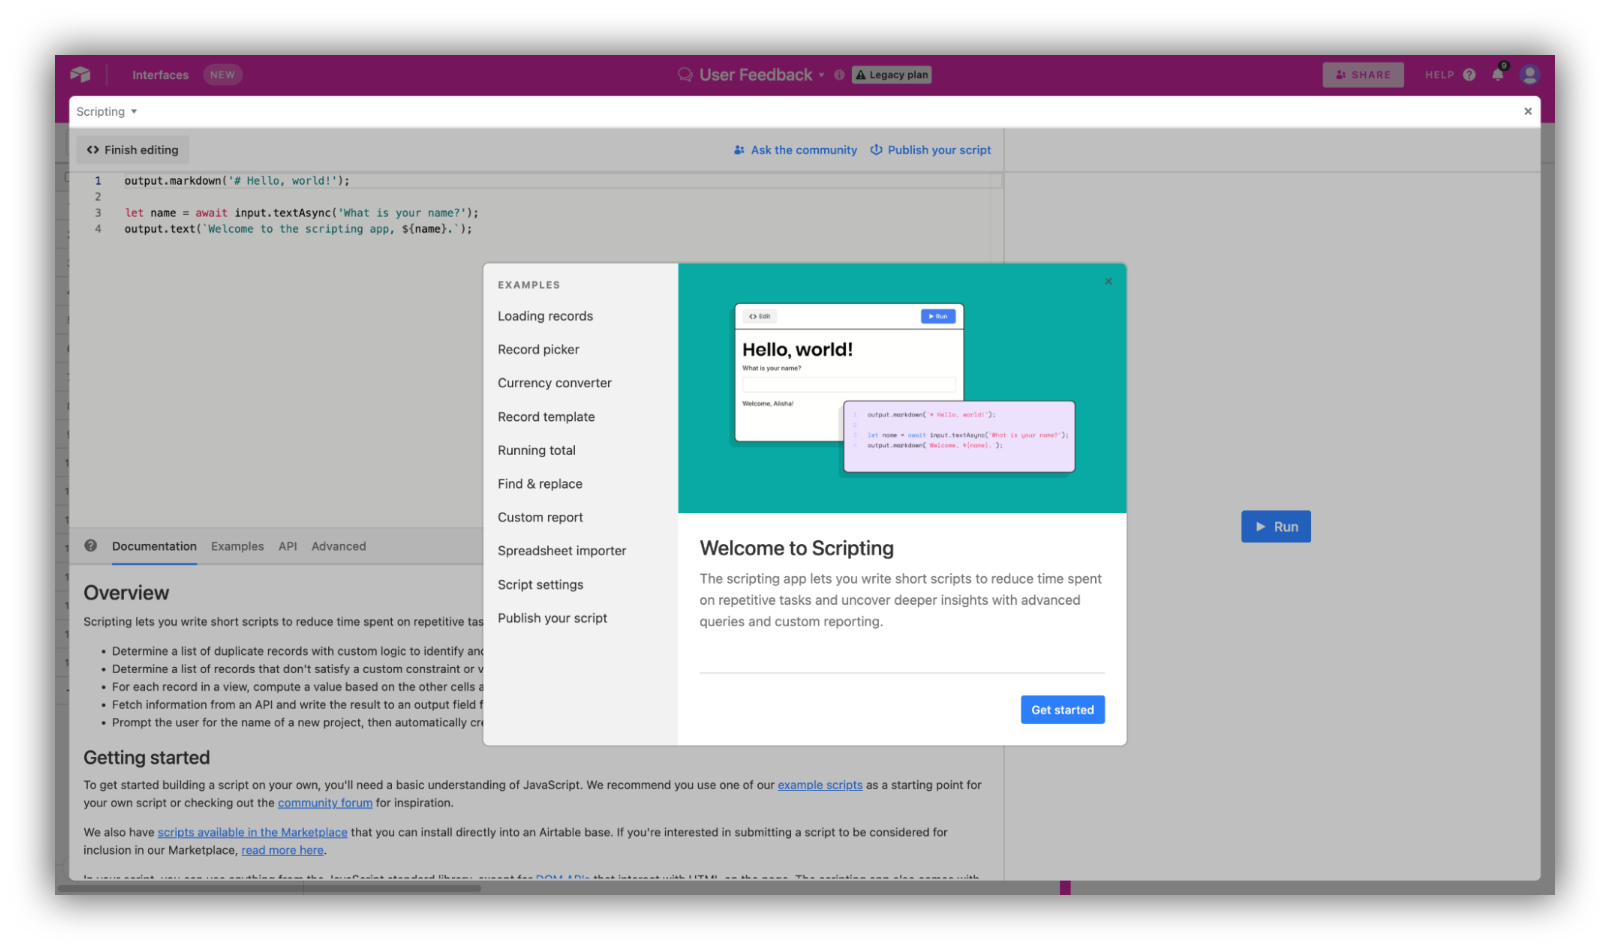
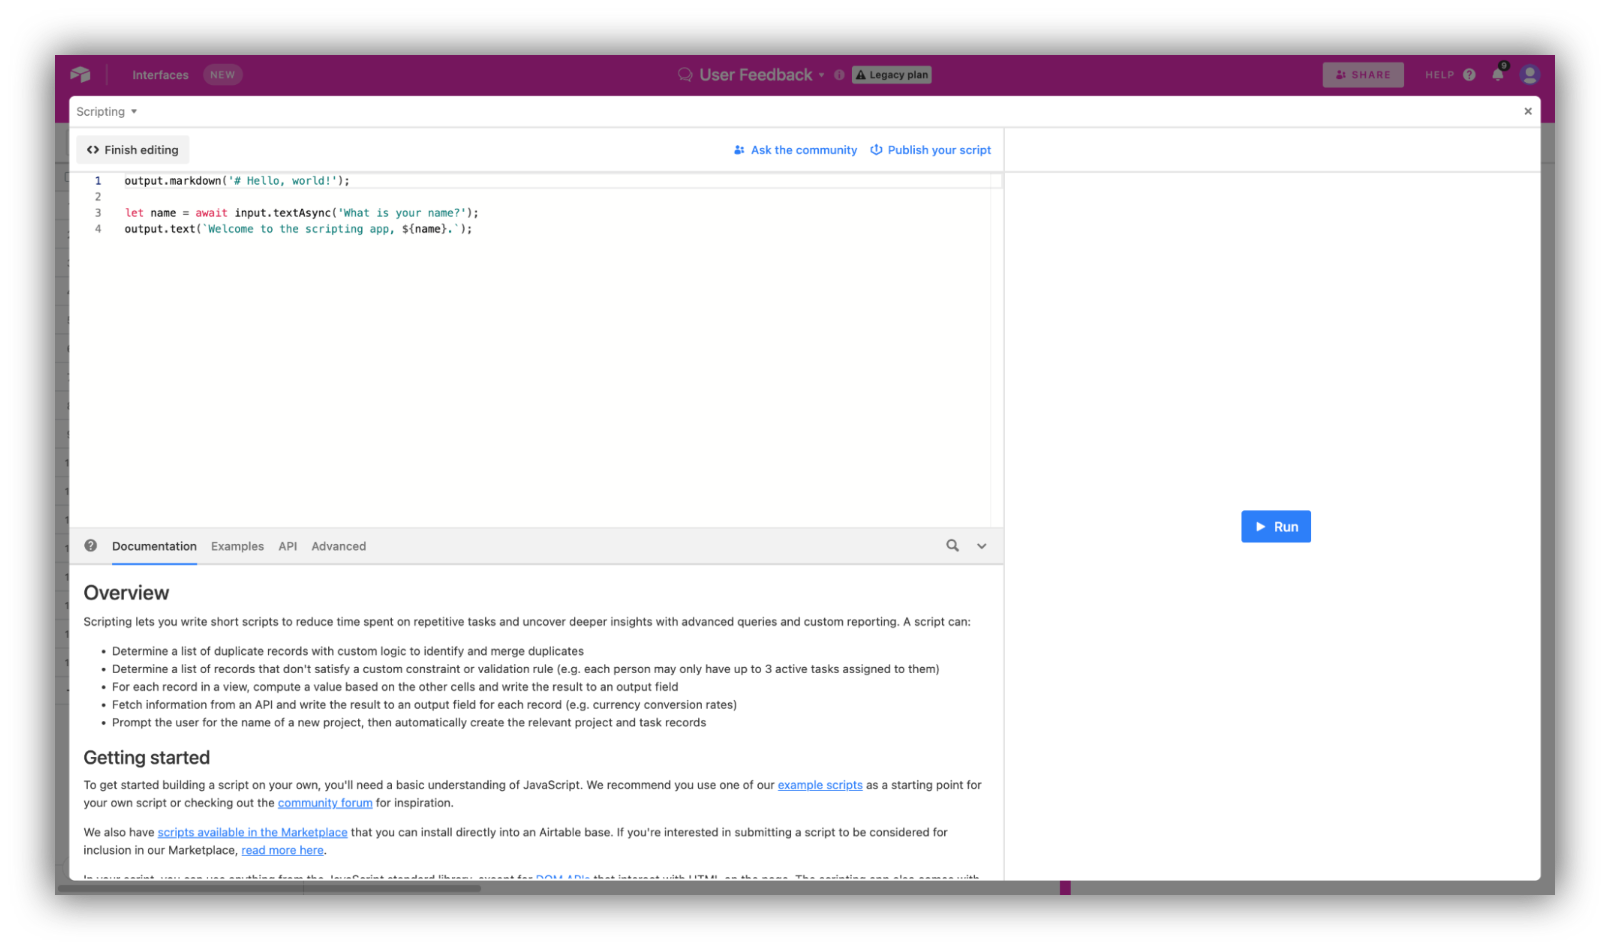
The interface of the scripting app will be familiar to anyone that has ever used a code editor. It is composed of three panes: A coding area for you to actually type and edit, an output area to run your code and see if it works, and a documentation area where you can find useful information and templates.
Coding in the scripting app will require you to be fluent in using Javascript, as well as some notions of HTML for the API section. Find out more details in the documentation Airtable provides, along with references and other resources.
If you’re not a developer, don’t worry! Non-technical folks are thankfully also able to enjoy the app thanks to the numerous templates and examples available in the script section of the marketplace. As a matter of fact, Airtable encourages tech-savvy users to share their own scripts by publishing them for the rest of the Airtable community, so we might see an increase in template apps in the near future.
To get you started, we’ve gathered 6 Airtable scripting examples you can implement in your bases today! Let’s jump into it.
5 examples of useful Airtable scripts
From a simple currency converter to a useful data importer, here are 6 fun scripts you can get started with when learning about Airtable scripting.
1. Converting one currency to another
Straightforward but super-useful, this script uses an API to look up the current price of any currency and automatically convert it to a different one. You can adjust it to fit whichever use case fits you best.
This is particularly handy if you're working with international businesses and/or clients and need to display financial data in one specific currency.
Here’s the script (make sure to update it with the name of your table and base + records):
// Change this to the name of a table in your base
let table = base.getTable('Invoices');
// Fetch conversion rate from API - you could change this to any API you want
let apiResponse = await fetch('https://api.exchangerate.host/latest?base=USD');
let data = await apiResponse.json();
let conversionRate = data.rates.GBP;
console.log(`Conversion rate: ${conversionRate}`);
// Update all the records
let result = await table.selectRecordsAsync();
for (let record of result.records) {
    await table.updateRecordAsync(record, {
        // Change these names to fields in your base
        'Amount (GBP)': record.getCellValue('Amount (USD)') * conversionRate,
    });
}
Find it in the Airtable scripts examples library.
2. Creating a custom report
Using this script, you are able to automatically filter records in a base of your choice and generate a summary of that data in a report. This is especially powerful to use as a starting point to create further data visualizations, reports, and dashboards.
Here’s the full script:
let table = base.getTable('Design projects');
let result = await table.selectRecordsAsync();
output.markdown('# Project report generator');
let type = await input.buttonsAsync(
    'Which report would you like to generate?',
    [
        'Completed Projects',
        'Incomplete Projects',
    ],
);
output.clear();
output.markdown(`# ${type} Report`);
let records;
if (type === 'Completed Projects') {
    records = result.records.filter(record => record.getCellValue('Complete'));
} else {
    records = result.records.filter(record => !record.getCellValue('Complete'));
}
function countByField(records, groupByField) {
    let counts = {};
    for (let record of records) {
        let key = record.getCellValueAsString(groupByField);
        if (key in counts) {
            counts[key] = counts[key] + 1;
        } else {
            counts[key] = 1;
        }
    }
    return counts;
}
output.markdown('## Categories');
let categoryCounts = countByField(records, 'Category');
output.table(categoryCounts);
output.markdown('## Projects');
output.table(
    records.map(record => ({
        Name: record.getCellValue('Name'),
        Category: record.getCellValue('Category'),
        'Project lead': record.getCellValue('Project lead'),
        Client: record.getCellValue('Client'),
    })),
);
output.markdown(`**Total**: ${records.length}`);
Find the entire script in the Airtable scripts examples library.
3. Removing duplicates
Anyone that’s ever worked in spreadsheets knows how annoying pesky duplicates can be. Scripting is a great way to automate such repetitive, menial tasks, identifying duplicates without the need for human involvement and removing them from your base.
Here’s the full script (make sure to update it with the name of your table and base + records):
let settings = input.config({
   title: 'Delete duplicates',
   description: `This script will delete duplicate records in a given table according to the value of
two input fields. Duplicate records are detected when they contain the same cell value for each identifying
field. For any two records that are considered duplicates, it will use a third comparison field to determine
which of the two records should be deleted.`,
   items: [
       input.config.table('table', { label: 'Table' }),
       input.config.field('firstIdField', {
           parentTable: 'table',
           label: 'First identifying field',
       }),
       input.config.field('secondIdField', {
           parentTable: 'table',
           label: 'Second identifying field',
       }),
       input.config.field('comparisonField', { parentTable: 'table', label: 'Comparison field' }),
   ],
});
let { table, firstIdField, secondIdField, comparisonField } = settings;
// Airtable limits batch operations to 50 records or fewer.
let maxRecordsPerCall = 50;
function choose(recordA, recordB) {
   let valueA = recordA.getCellValueAsString(comparisonField);
   let valueB = recordB.getCellValueAsString(comparisonField);
   return valueA > valueB ? { keep: recordA, discard: recordB } : { keep: recordB, discard: recordA };
}
let existing = Object.create(null);
let toDelete = [];
// Part 1: Identify duplicate records in need of deletion
//
// We don't modify the table contents in this Part in the interest of
// efficiency. This script may trigger a large number of deletions, and it's
// much faster to request that they be done in batches. When we identify a
// record that should be deleted, we add it to an array so we can batch the
// operations in Part 3 of the script.
let query = await table.selectRecordsAsync({
   fields: [firstIdField, secondIdField, comparisonField],
});
for (let record of query.records) {
   let key = JSON.stringify([
       record.getCellValue(firstIdField),
       record.getCellValue(secondIdField),
   ]);
   // If we've already encountered a record with identical field values,
   // either that record or the current record need to be removed.
   if (key in existing) {
       let { keep, discard } = choose(record, existing[key]);
       toDelete.push(discard);
       existing[key] = keep;
       // If this is the first time we've observed a record with these
       // particular field values, make a note of it so we can recognize
       // duplicates as we iterate through the rest.
   } else {
       existing[key] = record;
   }
}
// Part 2: Verify
//
// Inform the script's user of the changes to be made and await their
// confirmation.
output.markdown(`Identified **${toDelete.length}** records in need of deletion.`);
let decision = await input.buttonsAsync('Proceed?', ['Yes', 'No']);
// Part 3: Execute the necessary operations
if (decision === 'No') {
   output.text('Operation cancelled.');
} else {
   output.text('Applying changes...');
   while (toDelete.length > 0) {
       await table.deleteRecordsAsync(toDelete.slice(0, maxRecordsPerCall));
       toDelete = toDelete.slice(maxRecordsPerCall);
   }
   output.text('Done');
}
Find the full script in the Airtable Marketplace.
4. Finding and replacing
When dealing with large sets of data, finding and replacing specific snippets can quickly turn into an annoyance at best, and a massive undertaking at worst. This script allows you to automatically find occurrences of a specific text or string and replace it with another.
Here’s the script (make sure to update it with the name of your table and base + records):
	// edit these values to customize your script!
let table = base.getTable("Tasks");
let field = table.getField("Description");
let findText = await input.textAsync('Enter text to find:');
let replaceText = await input.textAsync('Enter to replace matches with:');
// Load all of the records in the table
let result = await table.selectRecordsAsync();
// Find every record we need to update
let replacements = [];
for (let record of result.records) {
    let originalValue = record.getCellValue(field);
    // Skip records which don't have the value set, so the value is null
    if (!originalValue) {
        continue;
    }
    let newValue = originalValue.replace(findText, replaceText);
    if (originalValue !== newValue) {
        replacements.push({
            record,
            before: originalValue,
            after: newValue,
        });
    }
}
if (!replacements.length) {
    output.text('No replacements found');
} else {
    output.markdown('## Replacements');
    output.table(replacements);
    let shouldReplace = await input.buttonsAsync('Are you sure you want to save these changes?', [
        {label: 'Save', variant: 'danger'},
        {label: 'Cancel'},
    ]);
    if (shouldReplace === 'Save') {
        // Update the records
        let updates = replacements.map(replacement => ({
            id: replacement.record.id,
            fields: {
                [field.id]: replacement.after,
            }
        }));
        // Only up to 50 updates are allowed at one time, so do it in batches
        while (updates.length > 0) {
            await table.updateRecordsAsync(updates.slice(0, 50));
            updates = updates.slice(50);
        }
    }
}
Find it in the Airtable scripts examples library.
5. Scheduling shifts based on availability
This script is ideal for managing staff schedules for businesses, from retail to restaurants, call centers, and more. Based on three tables (shifts, people, availability), the script automatically looks up the availability of your staff and assigns them a shift accordingly. Pretty smart, no?
Here’s the script (make sure to update it with the name of your table and base + records):
const config = input.config({
title: 'Shift scheduler',
description: 'Lets you assign individuals to particular shifts, based on their availability during that time.',
items: [
input.config.table('shiftsTable', {
label: '🛠 Shifts table',
description: 'Table that stores shifts that need staffing'
}),
input.config.field('shiftsStartField', {
label: 'Shifts table: start date/time field',
parentTable: 'shiftsTable',
}),
input.config.field('shiftsEndField', {
label: 'Shifts table: end date/time field',
parentTable: 'shiftsTable',
}),
input.config.field('shiftsPeopleField', {
label: 'Shifts table: assignees (people) field',
description: 'This field should link to people in the People table',
parentTable: 'shiftsTable',
}),
input.config.table('peopleTable', {
label: '👩🔧 People table',
description: 'Table that stores people'
}),
// Comment this out if you don't need an inactive field
input.config.field('peopleInactiveField', {
label: 'People table: inactive field (checkbox)',
description: 'Check this box to temporarily exclude someone from consideration',
parentTable: 'peopleTable',
}),
input.config.table('availabilityTable', {
label: '🗓 Availability table',
description: 'Table that stores the times when people are available'
}),
input.config.field('availabilityPersonField', {
label: 'Availability table: person field',
description: 'This field should link to one record in the People table',
parentTable: 'availabilityTable',
}),
input.config.field('availabilityStartField', {
label: 'Availability table: start date/time field',
parentTable: 'availabilityTable',
}),
input.config.field('availabilityEndField', {
label: 'Availability table: end date/time field',
parentTable: 'availabilityTable',
}),
input.config.field('availabilityUnavailableField', {
label: 'Availability table: unavailable field (checkbox)',
description: 'Check this box when someone is NOT available during the specified time period',
parentTable: 'availabilityTable',
}),
input.config.field('availabilityRepeatsField', {
label: 'Availability table: repeats weekly field (checkbox)',
description: 'Check this box when availability repeats every week',
parentTable: 'availabilityTable',
}),
// Comment this out if you don't need an inactive field
input.config.field('availabilityRepeatsUntilField', {
label: 'Availability table: repeats until field (date/time)',
description: 'Note: The "repeats until" field only works if the "repeats weekly" field is checked',
parentTable: 'availabilityTable',
}),
]
});
const MINUTE_IN_MS = 60 * 1000;
const WEEK_IN_MS = 7 * 24 * 60 * MINUTE_IN_MS;
var TIME_ZONE = 'client';
const VALID_TIME_ZONES = new Set(['client', 'utc'])
const TIME_FIELDS = [
config.availabilityStartField,
config.availabilityEndField,
config.availabilityRepeatsUntilField,
config.shiftsStartField,
config.shiftsEndField,
];
//
================================================================================
//
// TIME ZONE HELPER FUNCTIONS
//
// If the customer is using client time zones, then we need to be careful about
// daylight savings. For example, let's say Alice is available on Mondays 9AM-10AM
// starting in January. If we have a shift on a Monday 9AM-10AM in June, Alice
// should be available for that shift. One way to verify that Alice is available
// is to project her availability forward in time and then see if it overlaps with
// the shift time in June.
//
// If we're in the U.S., though, January will use standard
// time and June will use daylight savings time. If we naively project her
// availability forward to June by adding a whole number of weeks' worth of time
// to her availability time, we would end up with 10AM-11AM instead of 9AM-10AM.
// We could use Javascript's Date.setDate to add days instead, but we don't know
// how many days to add (and iterating is slow). In order to calculate how many
// weeks to add, we need to account for the time zone offsets present in each
// date/time field value.
//
// If the date/time field values are in GMT/UTC time instead, then we don't need
// to make this adjustment—9AM means the same thing in January as it does in June.
// To make things easier to work with, let's just validate that all date/time
// fields use the same time zone and store that time zone in a global.
function checkAndSetTimeZones() {
const timeZones = new Set();
for (const field of TIME_FIELDS) {
if (!field) continue; // in case someone comments out an optional field
if (!field.options || !field.options.timeZone) {
throw `options.timeZone not found in field ${field.name}. Is it a valid date/time field?`;
}
if (!VALID_TIME_ZONES.has(field.options.timeZone)) {
throw `Invalid time zone ${field.options.timeZone} in field ${field.name}`;
}
timeZones.add(field.options.timeZone);
}
if (timeZones.size > 1) {
throw 'All date/time fields must use the same time zone (client or GMT/UTC).'
}
TIME_ZONE = timeZones.values().next().value;
}
// Time-zone adjusted difference between two times. See comments above for a
// clearer description of what this does.
function getEffectiveMillisecondsBetween(start, end) {
return TIME_ZONE == 'client'
? treatAsUTC(end).getTime() - treatAsUTC(start).getTime()
: end.getTime() - start.getTime();
}
function treatAsUTC(date) {
return new Date(date.getTime() - date.getTimezoneOffset())
}
//
================================================================================
class TimeSpan {
constructor(start, end, repeats=false, repeatsUntil=null) {
this.start = start;
this.end = end;
this.repeats = repeats;
this.repeatsUntil = repeatsUntil;
this.lastRepeat = (this.repeats && this.repeatsUntil)
? this._getLastRepeatEndingAtOrBefore(this.repeatsUntil)
: null;
this.record = null;
}
isValid() {
return this.start && this.end && this.end > this.start
}
comesBefore(otherTimeSpan) {
return this.end <= otherTimeSpan.start
}
comesAfter(otherTimeSpan) {
return this.start >= otherTimeSpan.end
}
overlaps(otherTimeSpan) {
return !(this.comesBefore(otherTimeSpan) || this.comesAfter(otherTimeSpan))
}
covers(otherTimeSpan) {
return this.start <= otherTimeSpan.start && this.end >= otherTimeSpan.end
}
_getLastRepeatStartingBefore(time) {
return this.start >= time
? this
: this._getRepeat('start', time)
}
_getLastRepeatEndingAtOrBefore(time) {
return this.end > time
? this
: this.repeatsUntil
? this._getRepeat('end', time)
: null
}
_getRepeat(key, time) {
const diffMs = getEffectiveMillisecondsBetween(this[key], time);
let weeksBetween = Math.floor(diffMs / WEEK_IN_MS);
const newStartDate = new Date(this.start);
newStartDate.setDate(newStartDate.getDate() + weeksBetween * 7);
const newEndDate = new Date(this.end);
newEndDate.setDate(newEndDate.getDate() + weeksBetween * 7);
return new TimeSpan(newStartDate, newEndDate);
}
isAfterLastRepeatEnds(time) {
return this.lastRepeat && time > this.lastRepeat.end
}
getRepeatsThatOverlap(otherTimeSpan) {
const potentialRepeats = new Array();
if (this.repeats) {
let repeat = this._getLastRepeatStartingBefore(otherTimeSpan.start);
if (!this.isAfterLastRepeatEnds(repeat.end)) {
potentialRepeats.push(repeat);
}
while (true) {
repeat = repeat._getNextWeeklyRepeat();
if (repeat.comesAfter(otherTimeSpan) || this.isAfterLastRepeatEnds(repeat.end)) {
break;
}
potentialRepeats.push(repeat);
}
} else {
potentialRepeats.push(this);
}
return potentialRepeats.filter(repeat => repeat.overlaps(otherTimeSpan));
}
_getNextWeeklyRepeat() {
const newStartDate = new Date(this.start);
newStartDate.setDate(newStartDate.getDate() + 7);
const newEndDate = new Date(this.end);
newEndDate.setDate(newEndDate.getDate() + 7);
return new TimeSpan(newStartDate, newEndDate)
}
}
class TimeSpanCollection {
constructor(timeSpans) {
if (timeSpans) {
this.timeSpans = timeSpans.filter(ts => ts.isValid());
this.sort();
} else {
this.timeSpans = new Array();
}
}
add(timeSpan) {
if (timeSpan.isValid()) {
this.timeSpans.push(timeSpan);
this.sort();
}
}
// sort by start and then end time
sort() {
this.timeSpans.sort((a, b) => a.start - b.start || a.end - b.end)
}
hasOverlap(otherTimeSpan) {
for (let timeSpan of this.timeSpans) {
const overlapping = timeSpan.getRepeatsThatOverlap(otherTimeSpan);
if (overlapping.length > 0) {
return true
}
}
return false
}
getRepeatsThatOverlap(otherTimeSpan) {
const overlappingTimeSpans = new Array();
for (const timeSpan of this.timeSpans) {
overlappingTimeSpans.push(...timeSpan.getRepeatsThatOverlap(otherTimeSpan));
}
overlappingTimeSpans.sort((a, b) => a.start - b.start || a.end - b.end);
return overlappingTimeSpans
}
covers(otherTimeSpan) {
// We'll use this to track how much of the shift remains uncovered
const remainingOtherTimeSpan = new TimeSpan(otherTimeSpan.start, otherTimeSpan.end);
for (const timeSpan of this.getRepeatsThatOverlap(otherTimeSpan)) {
if (timeSpan.covers(remainingOtherTimeSpan)) {
return true
} else if (timeSpan.start <= remainingOtherTimeSpan.start) {
// We've partially covered remainingOtherTimeSpan, so adjust its start time
remainingOtherTimeSpan.start = timeSpan.end;
}
}
return false
}
}
class Person {
constructor(record) {
this.availability = new TimeSpanCollection();
this.unavailability = new TimeSpanCollection();
this.shifts = new TimeSpanCollection();
this.record = record;
}
isAvailableFor(shift) {
return !this.shifts.hasOverlap(shift)
&& !this.unavailability.hasOverlap(shift)
&& this.availability.covers(shift)
}
}
// ================================================================================
async function getShift() {
const shiftRecord = await input.recordAsync('Select a shift', config.shiftsTable);
if (shiftRecord) {
const shift = new TimeSpan(
new Date(shiftRecord.getCellValue(config.shiftsStartField)),
new Date(shiftRecord.getCellValue(config.shiftsEndField)),
);
if (shift.isValid()) {
shift.record = shiftRecord;
return shift;
} else {
throw 'The selected shift has invalid start and/or end times'
}
}
return null
}
async function getPeople() {
const people = {};
// initialize a new object for each person in the People table
const peopleQuery = await config.peopleTable.selectRecordsAsync();
for (const record of peopleQuery.records) {
// Skip adding new person to people object if they are excluded through config.peopleInactiveField
if (config.peopleInactiveField && record.getCellValue(config.peopleInactiveField)) continue;
people[record.id] = new Person(record);
}
// add time ranges where people are (or aren't) available
const availabilityQuery = await config.availabilityTable.selectRecordsAsync();
for (const record of availabilityQuery.records) {
const linkedPeople = record.getCellValue(config.availabilityPersonField);
if (linkedPeople && linkedPeople.length > 0 && linkedPeople[0].id) {
for (const linkedPerson of linkedPeople) {
if (linkedPerson.id in people) {
const key = record.getCellValue(config.availabilityUnavailableField)
? 'unavailability'
: 'availability';
const repeatsUntil = config.availabilityRepeatsUntilField
? record.getCellValue(config.availabilityRepeatsUntilField)
: null;
people[linkedPerson.id][key].add(new TimeSpan(
new Date(record.getCellValue(config.availabilityStartField)),
new Date(record.getCellValue(config.availabilityEndField)),
record.getCellValue(config.availabilityRepeatsField),
repeatsUntil ? new Date(repeatsUntil) : null,
));
}
}
}
}
// add shifts that people have already been assigned to
const shiftsQuery = await config.shiftsTable.selectRecordsAsync();
for (const record of shiftsQuery.records) {
const linkedPeople = record.getCellValue(config.shiftsPeopleField);
if (linkedPeople && linkedPeople[0]?.id) {
for (const linkedPerson of linkedPeople) {
// if linkedPerson is excluded through config.peopleInactiveField, they will not exist in the people object
if (!people[linkedPerson.id]) continue;
people[linkedPerson.id].shifts.add(new TimeSpan(
new Date(record.getCellValue(config.shiftsStartField)),
new Date(record.getCellValue(config.shiftsEndField)),
));
}
}
}
return people
}
function getAvailablePeople(people, shift) {
const availablePeople = new Array();
for (const person of Object.values(people)) {
if (person.isAvailableFor(shift)) {
availablePeople.push(person.record);
}
}
return availablePeople
}
async function selectPerson(shift, availablePeople) {
if (!availablePeople || !availablePeople.length) {
output.text('Nobody is available for this shift');
} else {
const person = await input.recordAsync('Add a person to the shift', availablePeople);
if (person) {
const shiftPeople = await shift.record.getCellValue(config.shiftsPeopleField) || new Array();
await config.shiftsTable.updateRecordAsync(
shift.record,
{[config.shiftsPeopleField.name]: [...shiftPeople, {id: person.id}]}
);
output.markdown(`Added ${person.name} to _${shift.record.name}_`);
}
}
}
// ================================================================================
checkAndSetTimeZones();
const shift = await getShift();
if (shift) {
const people = await getPeople();
await selectPerson(shift, getAvailablePeople(people, shift));
}
Find it in the Airtable Marketplace.
How to find more Airtable scripts and publish your own in the Airtable Marketplace
There are plenty more things you can achieve by creating your own scripts, but also by engaging with the Airtable community. Check out the Example Script Showcase to find out some of the great work from Airtable users around the world and to submit your own.
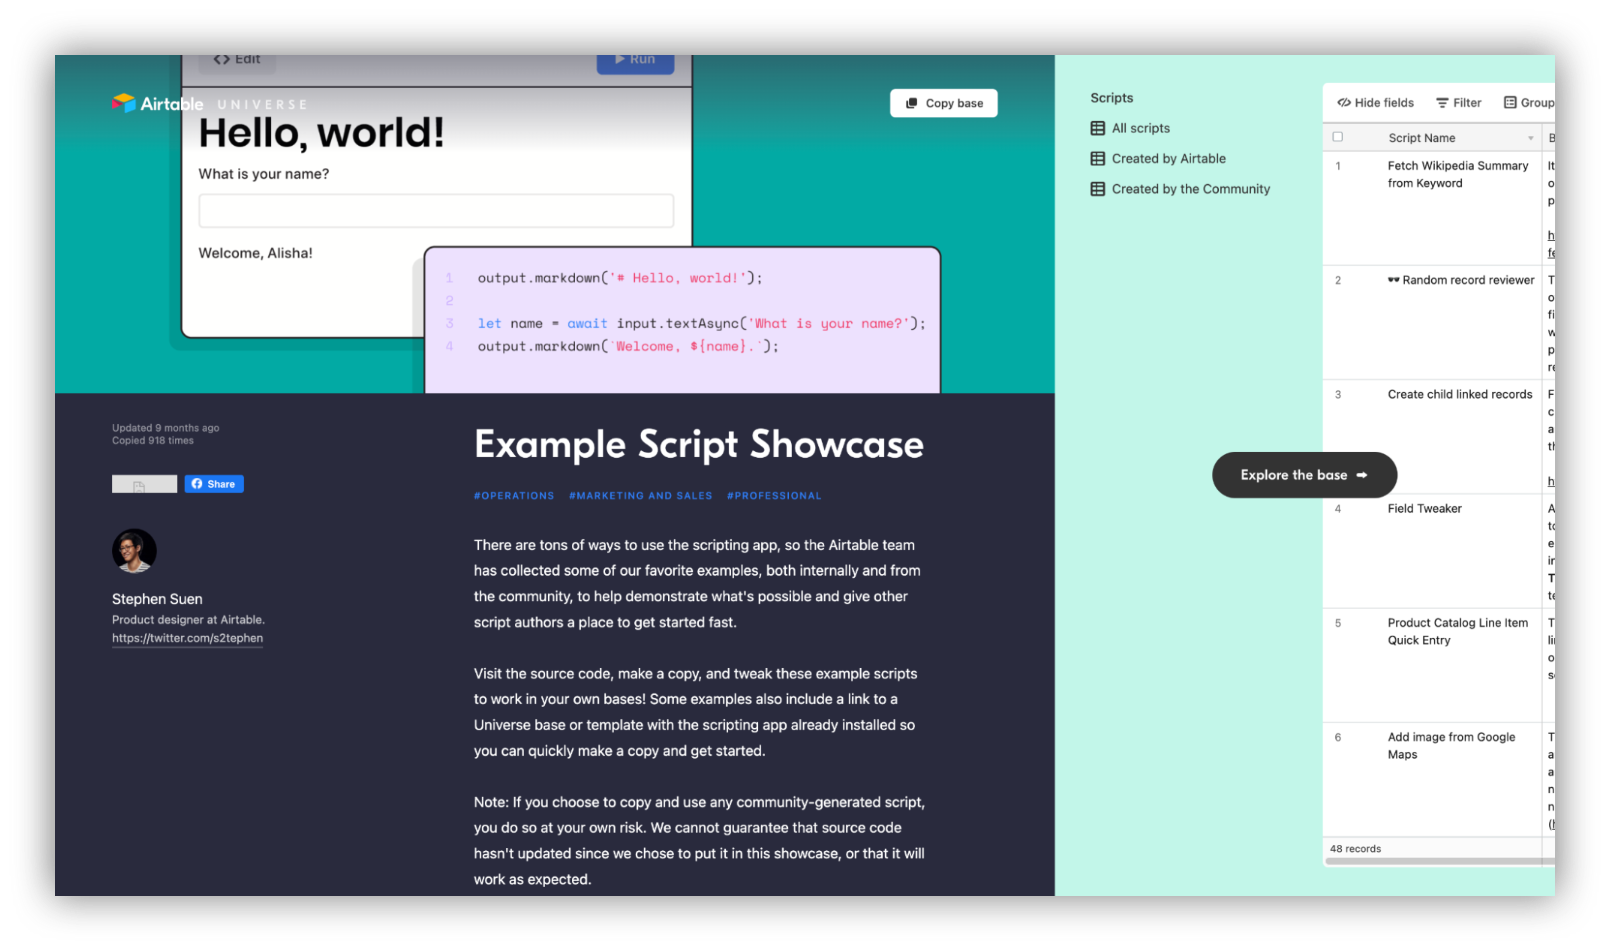
You are also able to submit your scripts to be available in the Airtable Marketplace! To do so, make sure to remember the following rules:
- The script should be able to run immediately, without edits from users
- The script code has to be clean, easy to use and documented properly
- The script details should be thorough and explicit (name, description, video explainers, etc)
Find out more in the guide provided by Airtable for Marketplace submissions.
Conclusion
We hope that these directions and examples have provided you with some context and clarity about Airtable scripting. This is an extremely powerful feature that can be used to create valuable automation easily, especially when paired with other automation capabilities from Airtable.
Additionally, it’s a great way to engage with the Airtable community by trying out scripts created by users and by sharing yours if you have the technical know-how to do so.
Talking about sharing, how about joining our Softr community and exchanging best practices, tips, and learnings with other Airtable and Softr users?
Happy scripting!
About Softr
Softr is an easy-to-use no-code platform that turns Airtable bases into powerful web apps, client portals, and internal tools. Softr offers a way for you to authenticate your end-users, control access to your content and data based on conditional rules like roles, logged-in status, subscription plans, etc. If you're using Airtable, you can use one of Softr’s templates so you can jumpstart building your app in a few minutes with drag and drop, without developers.
What is Softr
Softr is the easiest way to turn your data into powerful business apps—no code required. Connect to your spreadsheet or database, customize layout and logic, and share with your team or clients.
Join 700,000+ users worldwide, building client portals, internal tools, CRMs, dashboards, project management systems, inventory management apps, and more—all without code.
Join 700,000+ users worldwide, building client portals, internal tools, CRMs, dashboards, project management systems, inventory management apps, and more—all without code.
Get started free

Thierry Maout
Thierry is a content marketer based in France. He has extensive experience writing about B2B SaaS, automation, and user onboarding. Originally from France, he has lived and worked in Ireland, the US, Germany, the UK and Canada as well as collaborated with companies from all over the world including UserGuiding, Make (formerly Integromat), and others. Thierry has a Bachelor's degree in International Affairs from Le Havre University (France) as well as a Master's degree in Law, Economics, and Management from the Institute of Evolutionary Science of Montpellier (France). Passionate about education and the no-code movement, Thierry has been featured in publications such as UX Collective and The Startup on Medium. A frequent Softr collaborator (freelance-based), he’s also a former startup co-founder and has, among others, co-founded and managed growth at Fairwai.


Categories


