


As businesses want to provide personalized and efficient user experiences, integrating a custom front end with HubSpot CRM data is non-negotiable.
A well-designed front end can improve customer interactions, streamline workflows, and provide a seamless interface for accessing CRM data.
Whether you're a developer looking to use advanced frameworks or a business owner seeking a no-code solution, this guide offers a comprehensive overview of various methods to build a custom front end on top of HubSpot CRM data.
Options for building a custom front end on top of HubSpot CRM data
Developing directly on HubSpot
HubSpot provides a suite of built-in features and customization options that allow businesses to develop directly within its ecosystem. These tools are particularly beneficial for straightforward projects and those who prefer to stay within the HubSpot environment.
- HubSpot CMS: Utilize HubSpot’s content management system to create and manage website content. The CMS is equipped with drag-and-drop functionality, making it accessible for non-developers.
- Custom Modules: Create custom modules within the HubSpot CMS to add unique functionalities tailored to your business needs.
- HubSpot APIs: Use HubSpot’s APIs to fetch and display CRM data dynamically. This can include customer information, deal statuses, and more.
Pros:
- Direct development within HubSpot ensures seamless integration with existing HubSpot features, such as marketing, sales, and service tools.
- Utilizing HubSpot’s built-in tools provides access to extensive resources, including documentation, support, and community forums.
- Developing directly on HubSpot can streamline workflows, as all tools and data are within a single platform.
Cons:
- While HubSpot offers various customization options, they may be limited compared to what can be achieved with external tools and frameworks.
- Developers need to familiarize themselves with HubSpot’s proprietary systems, which may have a learning curve.
Using Softr
Softr is a powerful no-code platform that enables users to build sophisticated web applications, client portals, and more without writing a single line of code. It offers a user-friendly drag-and-drop interface, pre-built templates, and seamless integrations with various tools, including HubSpot.
Integration of HubSpot with Softr
Integrating HubSpot with Softr enables businesses to create customized client portals, forms, and other web applications that leverage HubSpot CRM data.
Here’s how to integrate HubSpot with Softr:
- Open your web browser and navigate to Softr's website.
- Log in to your Softr account using your credentials.
- Once logged in, locate the navigation menu on the left side of the screen.
- Click on "Data Sources" located in the lower-left corner of the dashboard.
- In the Data Sources section, you will see various options for different data sources.
- Select "HubSpot" from the list of available data sources.

- Follow the prompts to choose your HubSpot account and authenticate the connection.

Using external technologies
For businesses requiring more advanced customization, using external technologies such as JavaScript frameworks and backend frameworks is a viable option. This approach provides full control over the development process and allows for highly customized solutions.
JavaScript Frameworks:
- React: A popular library for building user interfaces, React is known for its efficiency and flexibility. It enables the creation of dynamic and responsive web applications.
- Angular: Developed by Google, Angular is a comprehensive framework for building complex web applications. It offers robust features for data binding, dependency injection, and more.
- Vue: Vue is a progressive JavaScript framework that is easy to integrate into projects. It is known for its simplicity and performance.
Backend Frameworks:
- Node.js: A JavaScript runtime built on Chrome's V8 engine, Node.js is ideal for building scalable network applications. It uses an event-driven, non-blocking I/O model.
- Django: A high-level Python web framework, Django encourages rapid development and clean, pragmatic design. It comes with a wide range of built-in features.
- Flask: A micro web framework written in Python, Flask is lightweight and easy to use. It is well-suited for small to medium-sized applications.
Examples of API Integration:
- API Setup: Register for API access on HubSpot and obtain your API keys. Set up your development environment to handle API requests.
- Authentication: Implement authentication mechanisms such as OAuth to securely access HubSpot data. Ensure that your application can handle token refreshes and secure storage of API keys.
- Fetching Data: Write scripts to pull data from HubSpot CRM using API calls. This can include customer information, deal statuses, and more. Handle API responses and errors appropriately.
Pros:
- External technologies provide the flexibility to create highly customized applications tailored to specific business needs.
- This approach is well-suited for complex applications that require advanced functionality and integrations.
- Developers have full control over the development process, including the ability to choose frameworks, libraries, and tools.
Cons:
- This approach requires a high level of technical expertise and programming skills.
- Developing custom applications with external technologies can be time-consuming.
- This method may incur higher costs due to the need for specialized developers and longer development timelines.
Steps to build a front end using HubSpot as a backend
Here’s how you can build a custom front end on top of HubSpot CRM within HubSpot:
Step 1: API Setup
- Register for API Access:
Go to the HubSpot developer portal and register your application to obtain API keys. These keys will allow your application to interact with HubSpot’s APIs.
- Set Up Authentication:
Implement OAuth or API key authentication in your application. This step ensures that your application can securely access HubSpot data.
- OAuth: OAuth is a more secure method of authentication that allows users to grant third-party applications access to their HubSpot data without sharing their credentials. Implement the OAuth flow to obtain access tokens and refresh tokens.
- API Keys: API keys provide a simpler method of authentication but should be handled securely. Store API keys in a secure location and avoid exposing them in client-side code.
Step 2: Frontend Development
- Create Components:
Develop UI components that will display CRM data. This includes creating tables, lists, and forms that interact with HubSpot APIs.
- Data Display: Use JavaScript frameworks like React, Angular, or Vue to create dynamic components that fetch and display CRM data. Implement state management to handle data updates and reactivity.
- Forms: Create forms that allow users to submit data to HubSpot. Implement form validation and error handling to ensure data integrity.
- Styling:
Apply CSS and design principles to create a visually appealing user interface. Use CSS frameworks like Bootstrap or Tailwind to streamline the styling process.
- UX Considerations: Focus on creating a user-friendly interface that is intuitive and easy to navigate. Conduct user testing to identify and address usability issues.
Step 3: Deployment and Maintenance
- Hosting Options:
Choose a hosting service that suits your application’s needs. Options include AWS, Heroku, Netlify, and more.
- AWS: It offers scalable and reliable cloud hosting solutions. Services like Amazon S3, EC2, and Lambda can be used to host and manage your application.
- Heroku: Heroku is a platform-as-a-service (PaaS) that simplifies the deployment and management of web applications. It supports various programming languages and frameworks.
- Netlify: Netlify is a popular choice for hosting static websites and frontend applications. It offers features like continuous deployment, serverless functions, and global CDN.
- Ongoing Updates:
Regularly update your application to ensure it remains compatible with HubSpot’s APIs. Monitor for changes in API endpoints, authentication methods, and data structures.
- HubSpot Synchronization: Implement mechanisms to synchronize your application with HubSpot CRM data. This can include scheduled API calls, webhooks, and real-time data updates.
- Security Considerations: Ensure that your application adheres to security best practices. This includes securing API keys, implementing data encryption, and conducting regular security audits.
Steps to build a front end using Softr
Step 1: Adding HubSpot as a Data Source
Log in to your Softr’s account and connect it with HubSpot using the method we shared above.
Step 2: Building Advanced Lead Capture Forms
- Create a New Application:
- In your Softr dashboard, navigate to create a new application. Start with a blank application template.

- Add a Form Block:
- In the application builder, go to the "Add Block" section.
- Select a customizable form from the list of available blocks.
- Customize Your Form:
- Modify the form to include fields relevant to your business, such as name, email, phone number, and company name.

- Customize the submit button text and add a thank you message to display upon form submission.
- Optionally, enable reCAPTCHA for added security.
- Adjust the form's style and visibility settings as needed.
- Connect Form to HubSpot:
- Go to the "Data Source" section and select HubSpot.

- Choose the appropriate HubSpot object (e.g., Contacts) to which the form data should be submitted.
- Ensure that the form fields in Softr are mapped correctly to the corresponding fields in HubSpot.
- Preview and Test the Form:
- Click on "Preview" to see the form in action.

- Fill out the form with test data and submit it to ensure it correctly populates the data in HubSpot.
Step 3: Building Customized Client Portals
- Create a New Portal Application:
- In Softr, either create a new application or use an existing one.
- Customize the application’s design, colors, and backgrounds to match your brand.

- Add a Data Display Block:
- Add a block that supports dynamic content, such as a list with horizontal cards.

- Connect this block to your HubSpot data source.
- Display HubSpot Data:
- Select the HubSpot object you want to display, such as Deals.

- Customize the display fields to show relevant information like deal name, stage, close date, and amount.
- Use the content section to map HubSpot fields to the display fields in Softr.
- Add Action Buttons (Optional):
- Add action buttons to allow users to add or modify data directly from the portal.
- Configure the buttons to interact with your HubSpot data.

- Set User Permissions:
- Adjust the visibility settings to ensure that only authorized users can access the portal.
- Set up user groups and assign permissions based on user roles.

Step 4: Granting External User Access
- Manage External Access:
- In your client CRM portal, find the option to manage external access.

- Configure the permissions to control what data external users can access.
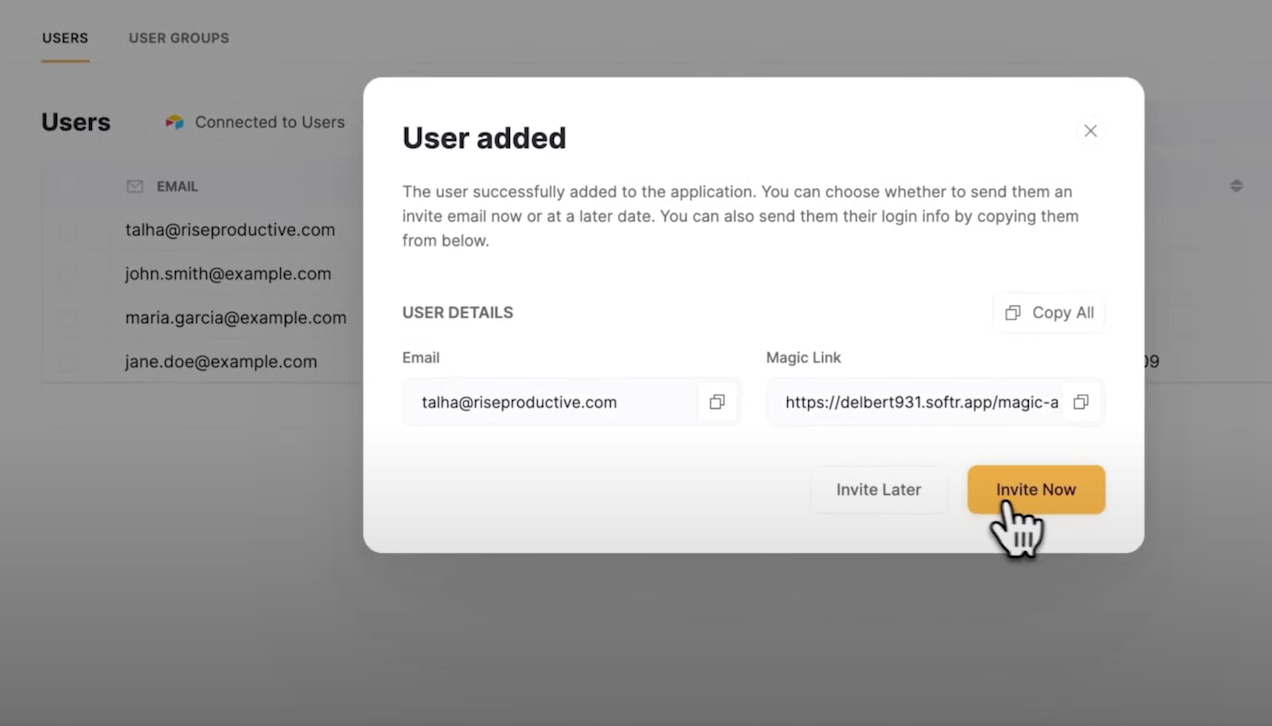
- Add Users:
- Add external users by entering their email addresses.

- Choose to invite users via a magic link or generate a temporary password.
- Set Up User Groups:
- Create user groups and assign users based on specific criteria or manually.

- Ensure the correct permissions are set for each user group.
- Test External Access:
- Invite an external user and verify they have the appropriate access level.
- Ensure the external user can interact with the CRM data as intended.

Benefits of Using Softr
After discussing both approaches, it's clear that using Softr to build a front end is far easier than building within HubSpot due to its simplified processes.
Here are the benefits you get when you consider using Softr:
- Ease of Use
Softr's user-friendly drag-and-drop interface allows you to create and customize web applications with ease. You don't need to have any coding knowledge; simply drag elements onto the canvas and arrange them to your liking. This intuitive interface makes it accessible for users of all skill levels to build professional-looking applications quickly.
What’s more, Softr offers a variety of pre-built templates that cater to different business needs. Whether you're building a client portal, a lead capture form, or an internal tool, you can start with a template that closely matches your requirements.
These templates can be customized to suit your specific needs, saving you time and effort in the design process.
- Cost Efficiency
Developing custom software from scratch can be prohibitively expensive, especially for small and medium-sized businesses. With Softr, you can avoid the high costs associated with hiring developers, purchasing infrastructure, and ongoing maintenance.
Softr’s licensing fees are significantly lower, providing a cost-effective solution for businesses looking to build web applications without breaking the bank.
- Softr Forever-Free Plan: Ideal for small projects, includes up to 5 workspace collaborators, 5 internal app users, 100 external app users (logged-in), and unlimited visitors (non-logged-in), all at no cost.
- Softr Basic Plan: Starting at $49 per month, this plan increases user limits and allows for custom CSS/JS in your apps.
- Softr Professional Plan: Priced at $139 per month, it unlocks features like conditional forms, calendars, and Kanban boards, supporting 50 internal and 5,000 external users, making it ideal for building internal client and partner portals.
- Softr Business Plan: For $269 per month, it provides advanced building blocks like org charts and timelines, downloadable mobile apps, enhanced security, and higher user limits, suitable for businesses with complex needs.
- Flexibility and Scalability
As your business grows, so do your software requirements. Softr allows you to adapt your applications to meet changing business needs.
You can easily modify existing features or add new ones without the need for extensive coding. This flexibility ensures that your software can grow alongside your business, providing continuous value.
One of the standout benefits of Softr is its no-code approach. You can add new features and functionalities to your applications without writing a single line of code. This empowers non-technical team members to contribute to the development process and makes it easier to iterate and improve your applications over time.
Conclusion
Integrating HubSpot CRM with Softr to build a custom front end offers strategic advantages beyond just a no-code solution.
It allows businesses to quickly iterate and deploy changes based on user feedback, ensuring all CRM data is consistent and up-to-date. Softr’s advanced features like conditional forms and customizable user permissions enable the creation of personalized and secure user experiences without the need for custom development.
This combination of agility, cost-efficiency, and powerful integration makes Softr an invaluable tool for businesses looking to build sophisticated front ends on top of HubSpot CRM. Sign up for Softr today to experience these benefits.
What is Softr
Softr is the easiest way to turn your data into powerful business apps—no code required. Connect to your spreadsheet or database, customize layout and logic, and share with your team or clients.
Join 700,000+ users worldwide, building client portals, internal tools, CRMs, dashboards, project management systems, inventory management apps, and more—all without code.
Join 700,000+ users worldwide, building client portals, internal tools, CRMs, dashboards, project management systems, inventory management apps, and more—all without code.
Get started free

Aanchal Parmar


Categories


